• Home
    • Our Team
    • Our Values
    • Careers
    • What We Treat
    • How We Treat
    • Testimonials
    • Insurance
    • Pay Your Bill
    • FAQ
    • COVID-19
    • Performance Hubs
    • Health & Wellness
    • 3D Motion Capture Lab
  • Locations
  • Blog
  • Ask A PT
  • Appointments
Menu

Salmon Bay Physical Therapy

Seattle-Based Physical Therapy Practice, Serving Ballard and Fremont
  • Home
  • About
    • Our Team
    • Our Values
    • Careers
    • What We Treat
    • How We Treat
    • Testimonials
  • Patient Resources
    • Insurance
    • Pay Your Bill
    • FAQ
    • COVID-19
    • Performance Hubs
    • Health & Wellness
    • 3D Motion Capture Lab
  • Locations
  • Blog
  • Ask A PT
  • Appointments

SBPT Blog

How To (Properly) Calculate Your Target Heart Rate Zone

September 21, 2020

Monitoring our heart rate during exercise is an excellent way to determine and quantify the intensity of our workout. But what intensity should we be working out at and what is the best way to calculate this? The traditional method of calculating your target heart rate (Percentage of Predicted Maximum Heart Rate) factors in only your age (Predicted Max HR = 220 - Age). For example, world-class ultramarathoner Scott Jurek is 46 years old and therefore has a predicted maximum heart rate of 174 beats per minute (bpm). While using this traditional method, most recommend a target heart rate zone (the zone you want your heart rate in during exercise) to fall between 50-85% of your maximum heart rate. For Scott Jurek, we find his target heart rate zone to be roughly 87-148 bpm. The benefit of this method lies in the simplicity of the calculation. However, there are shortfalls of utilizing this method to calculate target heart rate zones. First, the range of this target heart rate zone is much too large and subsequently not very prescriptive. Second, the low end of this target heart rate zone may not be attainable during exercise, especially in older adults with higher resting heart rates. For example, the predicted maximum heart rate for a 75 year old woman is 145 bpm. Let’s assume this individual has a resting heart rate of 75, which is fairly typical. Utilizing the traditional method results in a calculated target heart rate zone of 73-124 bpm. As you can see, her resting heart rate is higher than the low end of her target heart rate zone for exercise. Therefore, the percentage maximum heart rate method of calculating her target heart rate zone would say she is exercising at rest, which is nonsensical. In other words, the traditional method often prescribes heart rates that are too low when working out at lower intensities, especially in older adults. Third, the traditional method fails to factor in your level of fitness, thus overly simplifying exercise prescription for a variable population. Since the traditional method of calculating your target heart rate fails to factor in your resting heart rate, it will prescribe the same target heart rate zone for Scott Jurek as an age-matched couch potato who smokes two packs per day. You see, as you become more fit, your resting heart rate will decrease as your heart becomes stronger and subsequently more efficient at pumping blood to the rest of your body. A highly trained athlete may have a resting heart rate of 48 bpm while the sedentary smoker may have a resting heart rate of 88 bpm. If they are both 40 years old, the traditional method of calculating target heart rate would recommend exercising between 90 and 153 bpm for both individuals. The traditional method therefore lacks this level of specificity.

So what is a better way to calculate your target heart rate zone? The answer is using the Karvonen method, otherwise known as the Heart Rate Reserve (HRR) method. The Karvonen method factors in both your age and resting heart rate, allowing for a more precise and effective target heart rate zone. The low end of the target heart rate zone tends to be at a higher heart rate than the traditional method of calculating target heart rate zones, while the predicted maximum heart rate is still the same. Those with a higher resting heart rate will see a higher number at the low end of the target heart rate zone as compared to those with a lower resting heart rate, to account for variability in the baseline levels of cardiovascular fitness within the population. Click on the link below to calculate your target heart rate zone using the Karvonen method:

TARGET HEART RATE CALCULATOR

Once calculated, it is recommended that you use this target heart rate zone to monitor your intensity during your workouts, in order to ensure that you are exercising at an intensity high enough to provide a cardiovascular benefit. This will help you get the most out of your exercise routine moving forward.

To find more information on heart rate or how to find your pulse, CLICK HERE.

-Grant Hennington, DPT

In Cycling, Running, Patient Education, Health & Wellness, Physical Activity Tags Heart Rate, Exercise, Training

By The Numbers: Injury Risk In Runners

August 17, 2020

Running is a tremendously popular sport, with approximately 40 million people running regularly in the United States. This is not particularly surprising given all of the well-documented health benefits of this form of physical activity. Unfortunately, running also carries with it a high rate of injury, with up to half of runners experiencing an injury on a yearly basis. While many factors play into this high rate of injury among runners, two primary risk factors stand out: history of previous injury and overtraining. With these in mind, here are some important numbers to be aware of when designing or following a training program.

  • 40

    • Multiple studies have shown that running greater than 40 miles per week significantly increases the risk of injury

  • 13

    • Runs longer than 13 miles should be done no more than once every 14 days, as exceeding this significantly increases the risk of injury

  • 10%

    • While this number is hotly debated due to inconsistent evidence, it is generally accepted that increases in weekly training mileage should not exceed 10% per week, as doing so increases the risk of injury

  • 6

    • Running 6 or more days per week significantly increases the risk of injury

  • 4-5

    • With respect to injury, most regular runners do best when training no more than 4-5 days per week, with at least 1 day of rest and 1-2 days of cross-training built in

  • 2-3

    • Runners should limit themselves to no more than 2-3 marathons per year

Keep in mind that these are numbers from a variety of prospective and retrospective studies on specific populations of runners and may not directly apply to you. However, they do help provide metrics for you to use when evaluating your own training program, whether it be for your first 5k or your attempt to qualify for the Boston Marathon. In general, most training programs should progress slowly, incorporate rest days, and include cross-training exercises that promote improved strength and stability. It is difficult to enjoy running when injured so keep these numbers in mind, as they may help you lower your overall risk of injury when training for your next race.

Run safely!

-Grant Hennington, DPT

In Running Tags Running, Running Injuries, Training, Trail Running
BStrongLeadPhoto.jpg

Blood Flow Restriction Therapy

August 11, 2020

High load - high intensity training has been shown time and again to be one of the most successful ways to make significant strength gains and muscle hypertrophy. However, there are many conditions and pathologies (post-operative, osteoarthritis, chronic pain, etc.) that require strengthening, but are unable to tolerate the demands of a high load - high intensity workout in order to achieve the desired results. Blood Flow Restriction Therapy (BFRT) is a method of training that allows a person to make significant strength gains through low load training, thus reducing overall stress on the body.

BFRT utilizes pneumatic cuffs that are applied to the extremities and in turn provide external pressures occluding venous outflow while maintaining arterial blood flow. This leads to the release of hormones, hypoxia (reduction of oxygen to the muscles and ultimately leading to the production of lactate), and cellular swelling. Ultimately, these physiological effects lead to strength gains and muscle hypertrophy, which are all desired effects of high load -high intensity training, but accomplished through the completion of low load training. 

A typical BFRT workout includes 3-5 exercises at a training volume of 75 repetitions over 4 sets (30 reps, 15 reps, 15 reps, 15 reps) with a 30-60 second rest break between sets. As stated above, BFRT should be performed at a low load, with studies showing a load of 20-40% of an individual’s 1 repetition max being most efficient. The pneumatic cuffs should be left on for the entirety of the workout (maximum of 20 minutes at a time) in order to get the desired physiological effects. 

For more information about the effects, application, and safety of Blood Flow Restriction Therapy, CLICK HERE or contact us through our Ask A PT feature.

-Brian Collins, DPT

References:

  • https://www.physio-pedia.com/Blood_Flow_Restriction_Training

  • https://www.apta.org/patient-care/interventions/blood-flow-restriction/what-to-know-about-blood-flow-restriction-training

  • Patterson SD, Hughes L, Warmington S, et al. Blood Flow Restriction Exercise: Considerations of Methodology, Application, and Safety [published correction appears in Front Physiol. 2019 Oct 22;10:1332]. Front Physiol. 2019;10:533. Published 2019 May 15. doi:10.3389/fphys.2019.00533

In Patient Education Tags Blood Flow Restriction Therapy, Physical Therapy, Strength, Rehabilitation, Training

Training For Climbing Season From Home

April 21, 2020

Climbing season may be on hold as we begin the spring in our homes, but even with the gyms and crags closed down, that doesn’t mean you have to stop training for climbing. Here are some tips for training at home on a hangboard.

Hangboarding 101

A hangboard is the most effective way to train for climbing at home. If you don’t already have one, there are lots of different premade hangboards available online. Pick a hangboard that has a variety of edges and grips. You want the holds to be challenging. Ideally the hangboard has several holds that you can just barely hang onto with your full body weight, and there should also be some holds that you can’t quite hang onto without unweighting yourself with a pulley.

Basic Setup

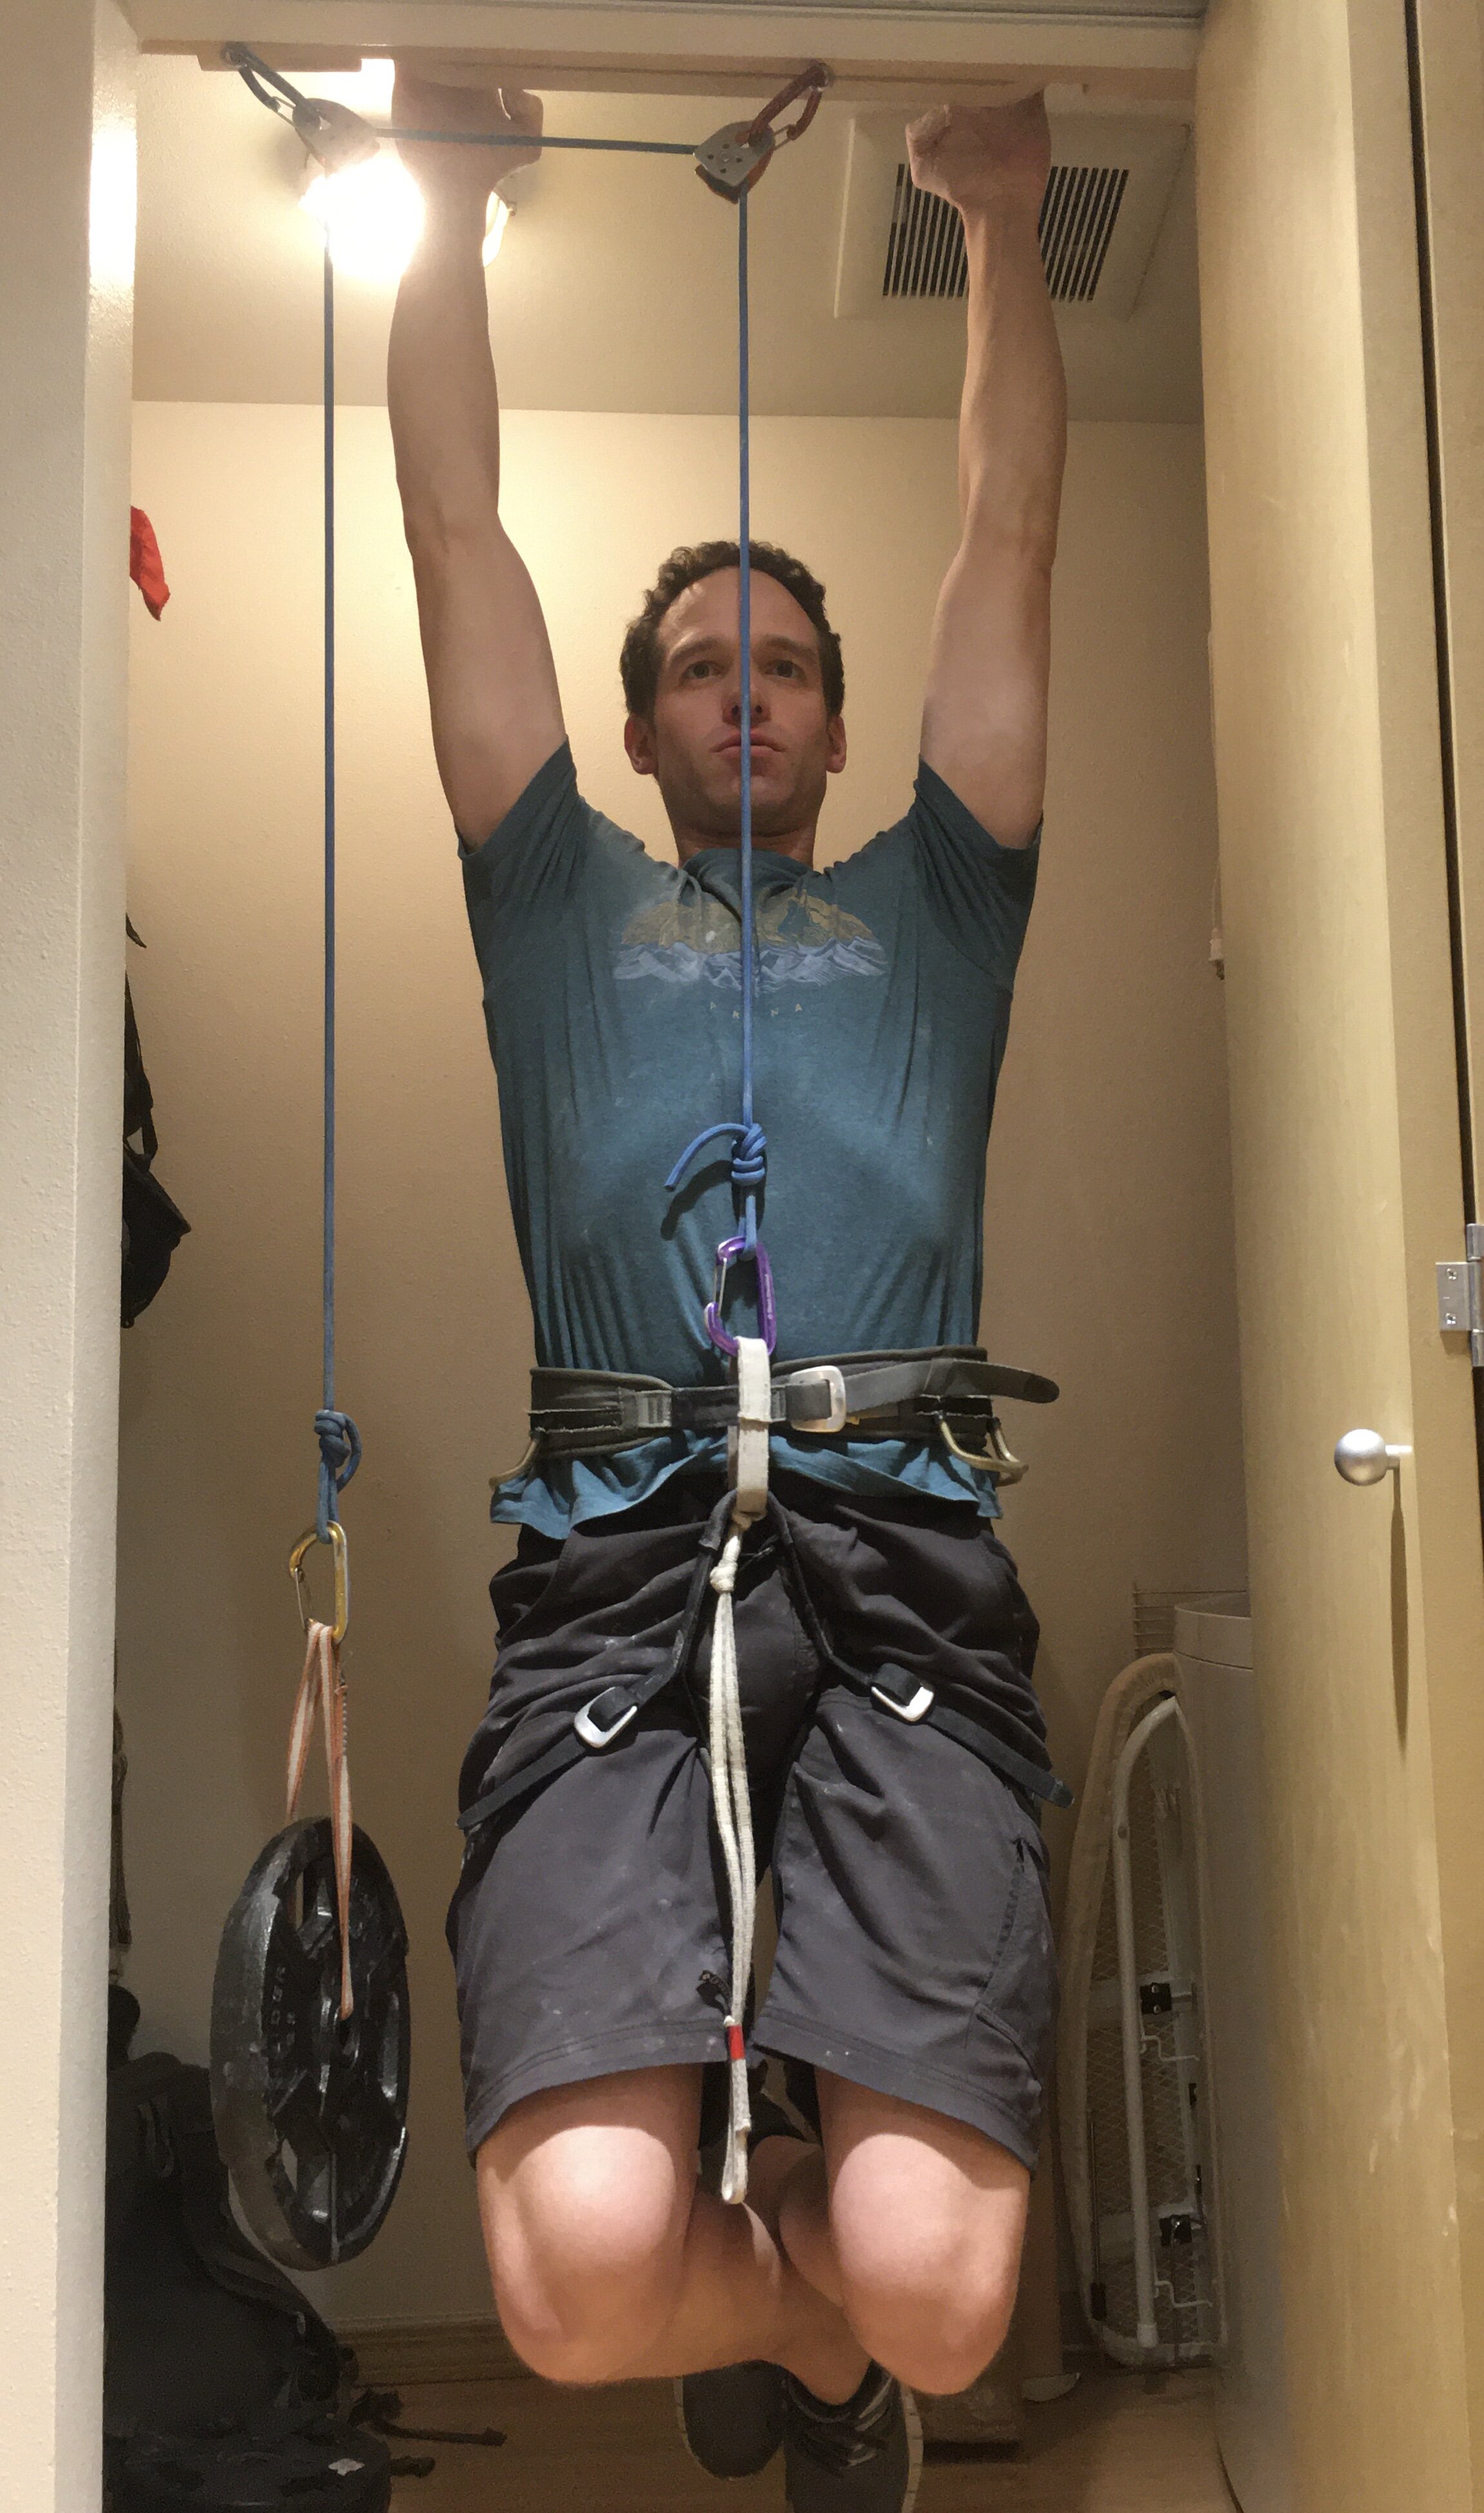
Install the hangboard over a doorframe or somewhere that you can hang freely. Typically you will mount the hangboard on a plywood mounting board which you can screw directly into the studs over the door frame. You’ll also want to add two pulleys underneath the hangboard to subtract weight when you hang. A cheap crevasse rescue pulley works fine attached with a carabiner, and you can use eye bolts to attach the pulley/carabiner to the underside of the hangboard.

Hangboard Setup

Hangboard Setup

Basic Hangboard Technique: The Dead-Hang

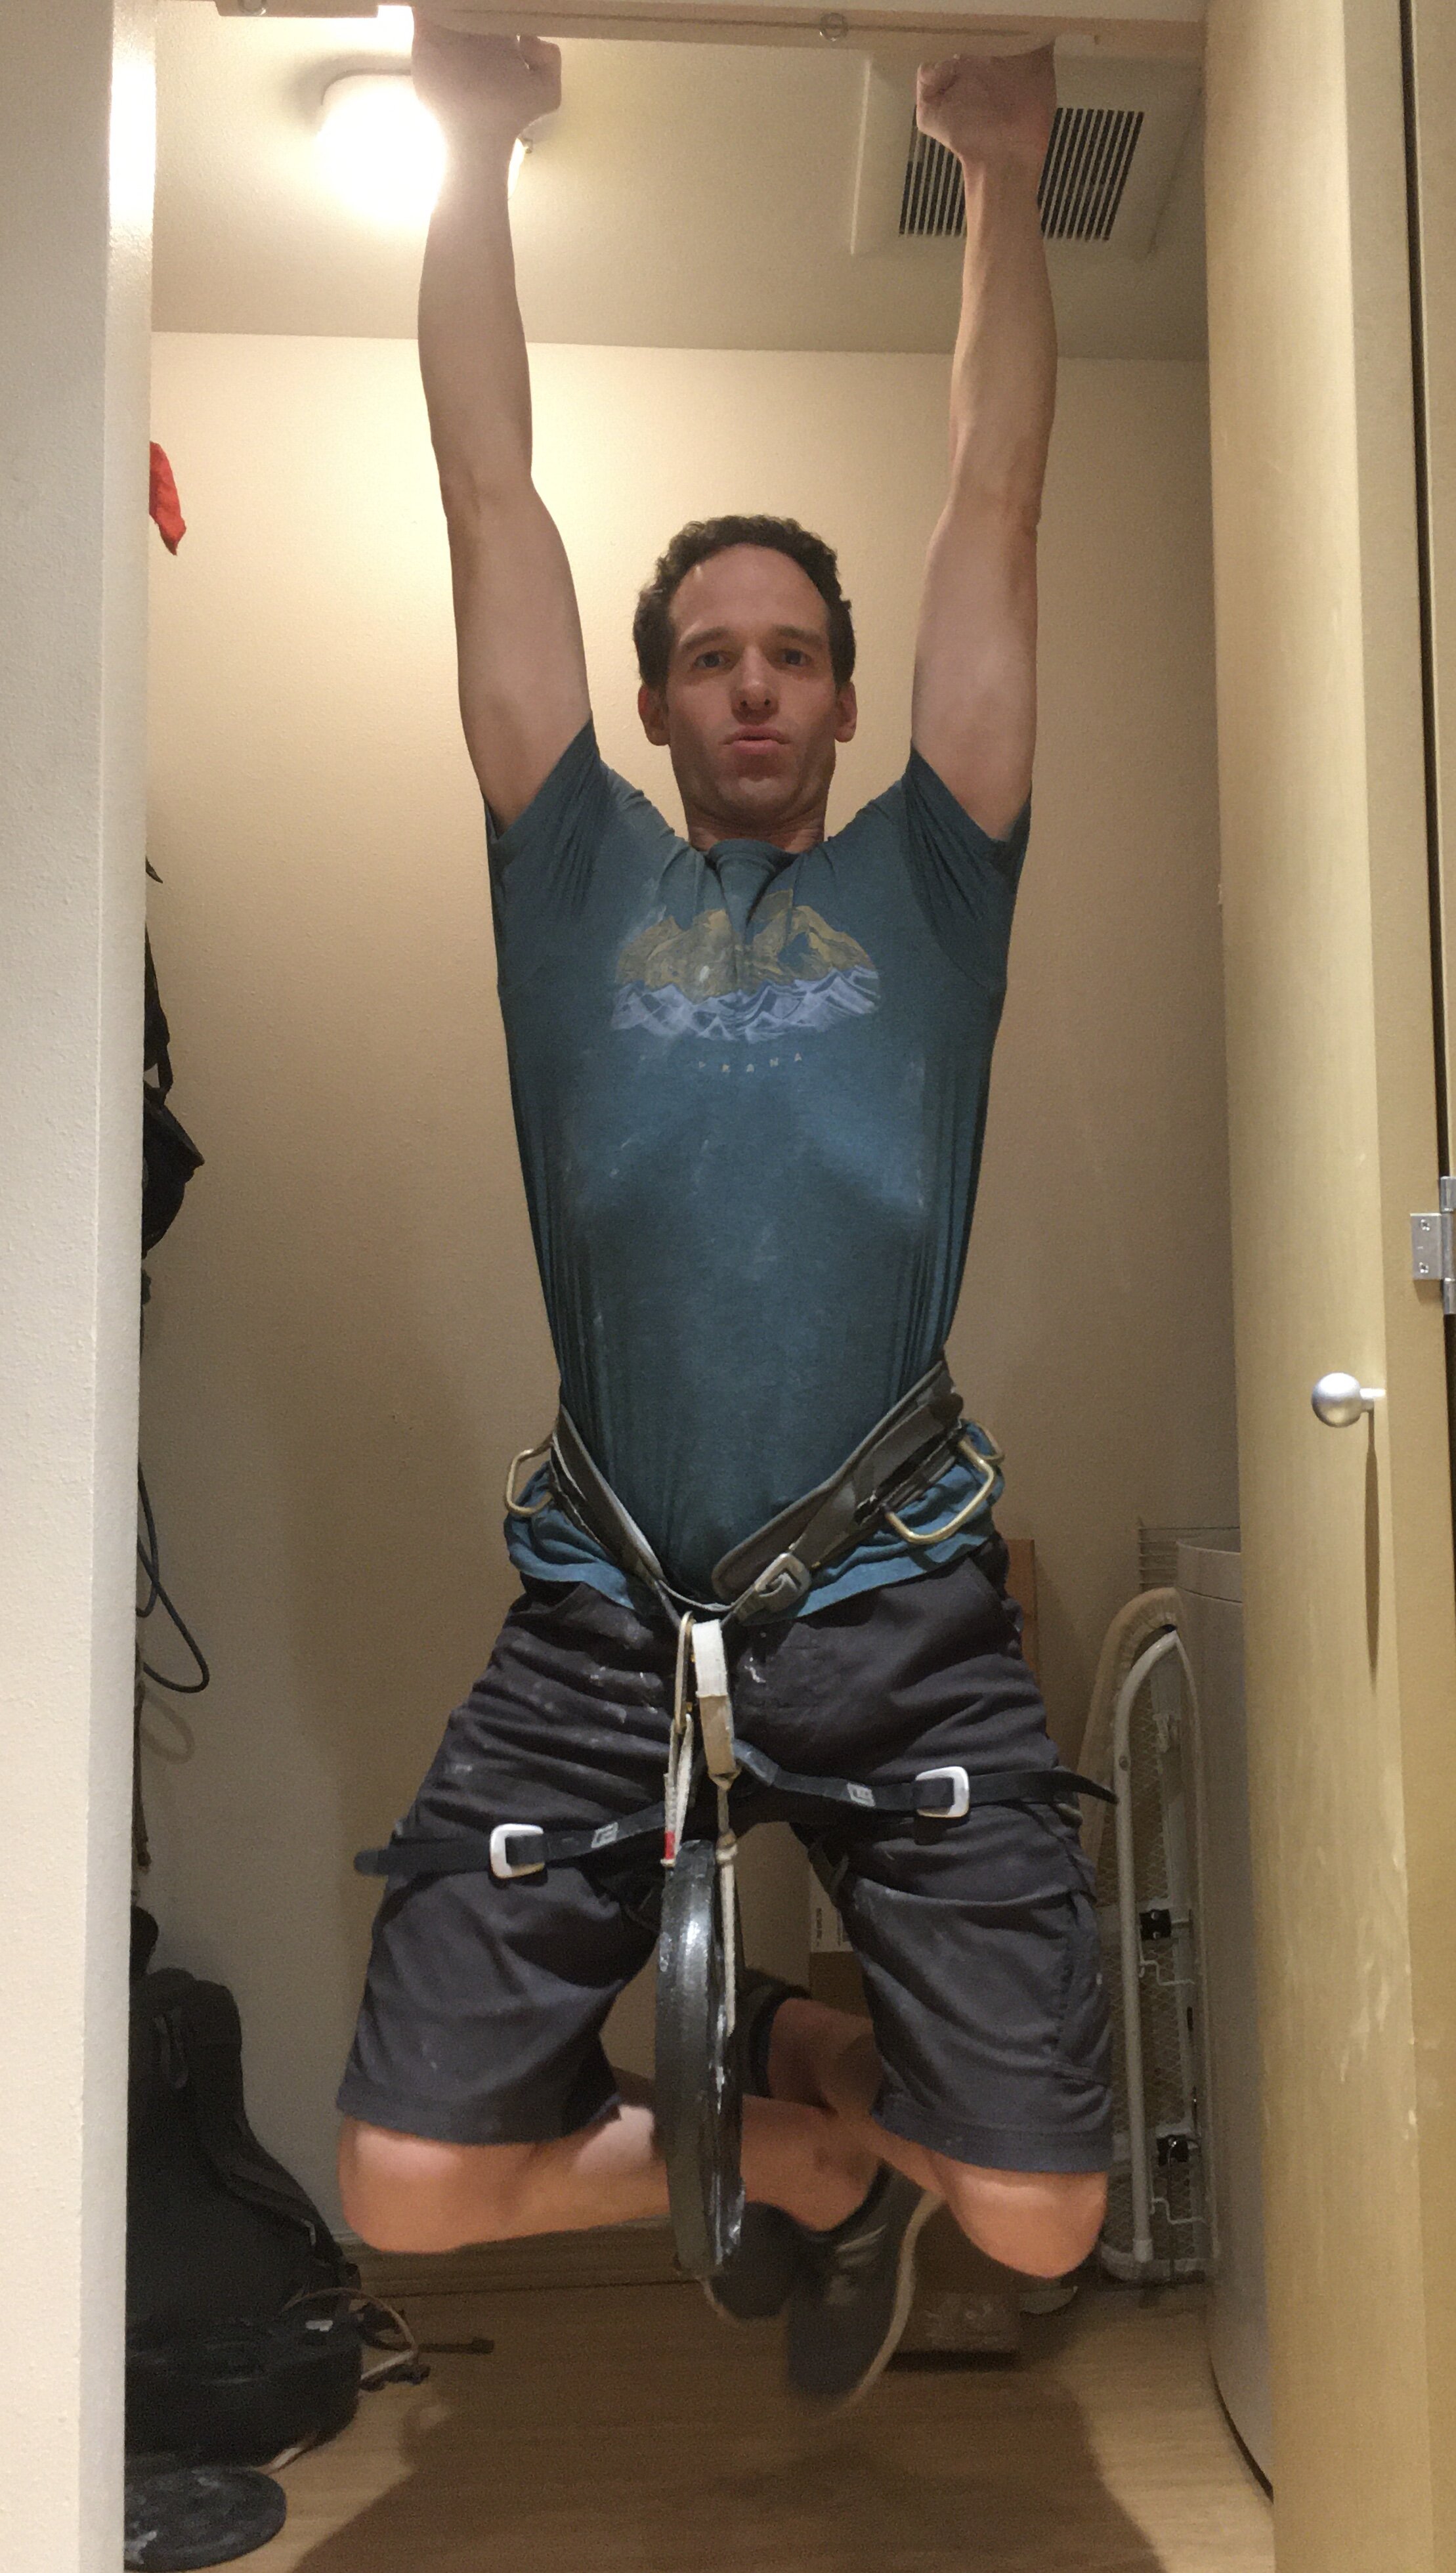
The most basic type of hangboard training that uses your body weight is the dead-hang. With the dead-hang, you’re not trying to do a pull-up on the hangboard. You are simply trying to hang onto the hangboard for a short period of time. You should hang with engaged shoulder blades, meaning that there should be some room between your shoulders and your ears (don’t hang limp). Your elbows should be engaged too with the arm straight or slightly bent. Now pick an edge that is hard to hang on. Try to add weight to your harness or subtract weight through the pulleys so that you are near failure when you hang. 

Unweighted Hang
Unweighted Hang
Weighted Hang
Weighted Hang

Hangboard Protocols

There are a few different dead hang protocols that most climbers use. The “max hang” protocol is the simplest. It involves adding the maximum weight or subtracting the minimum weight that you can tolerate for a 10 second hang. Hang for 10 seconds and then recover for 3 minutes. Repeat this for 6-10 sets on different edges and grips. Max hangs are good for building overall strength.

Another popular protocol uses “repeaters.” Begin by adding or subtracting weight to your harness so you are near failure at the end. With repeaters, you do a timed hang followed by a brief rest, and you repeat this for several repetitions. The most common repeater timing is a 7 second hang followed by a 3 second rest repeated 6 times (this will add up to a minute of hangs and rests). Take a 3 minute recovery after doing repeaters, and then complete several more sets on different holds/grips. Repeaters help build strength, but also challenge your endurance a little bit too.

Grips

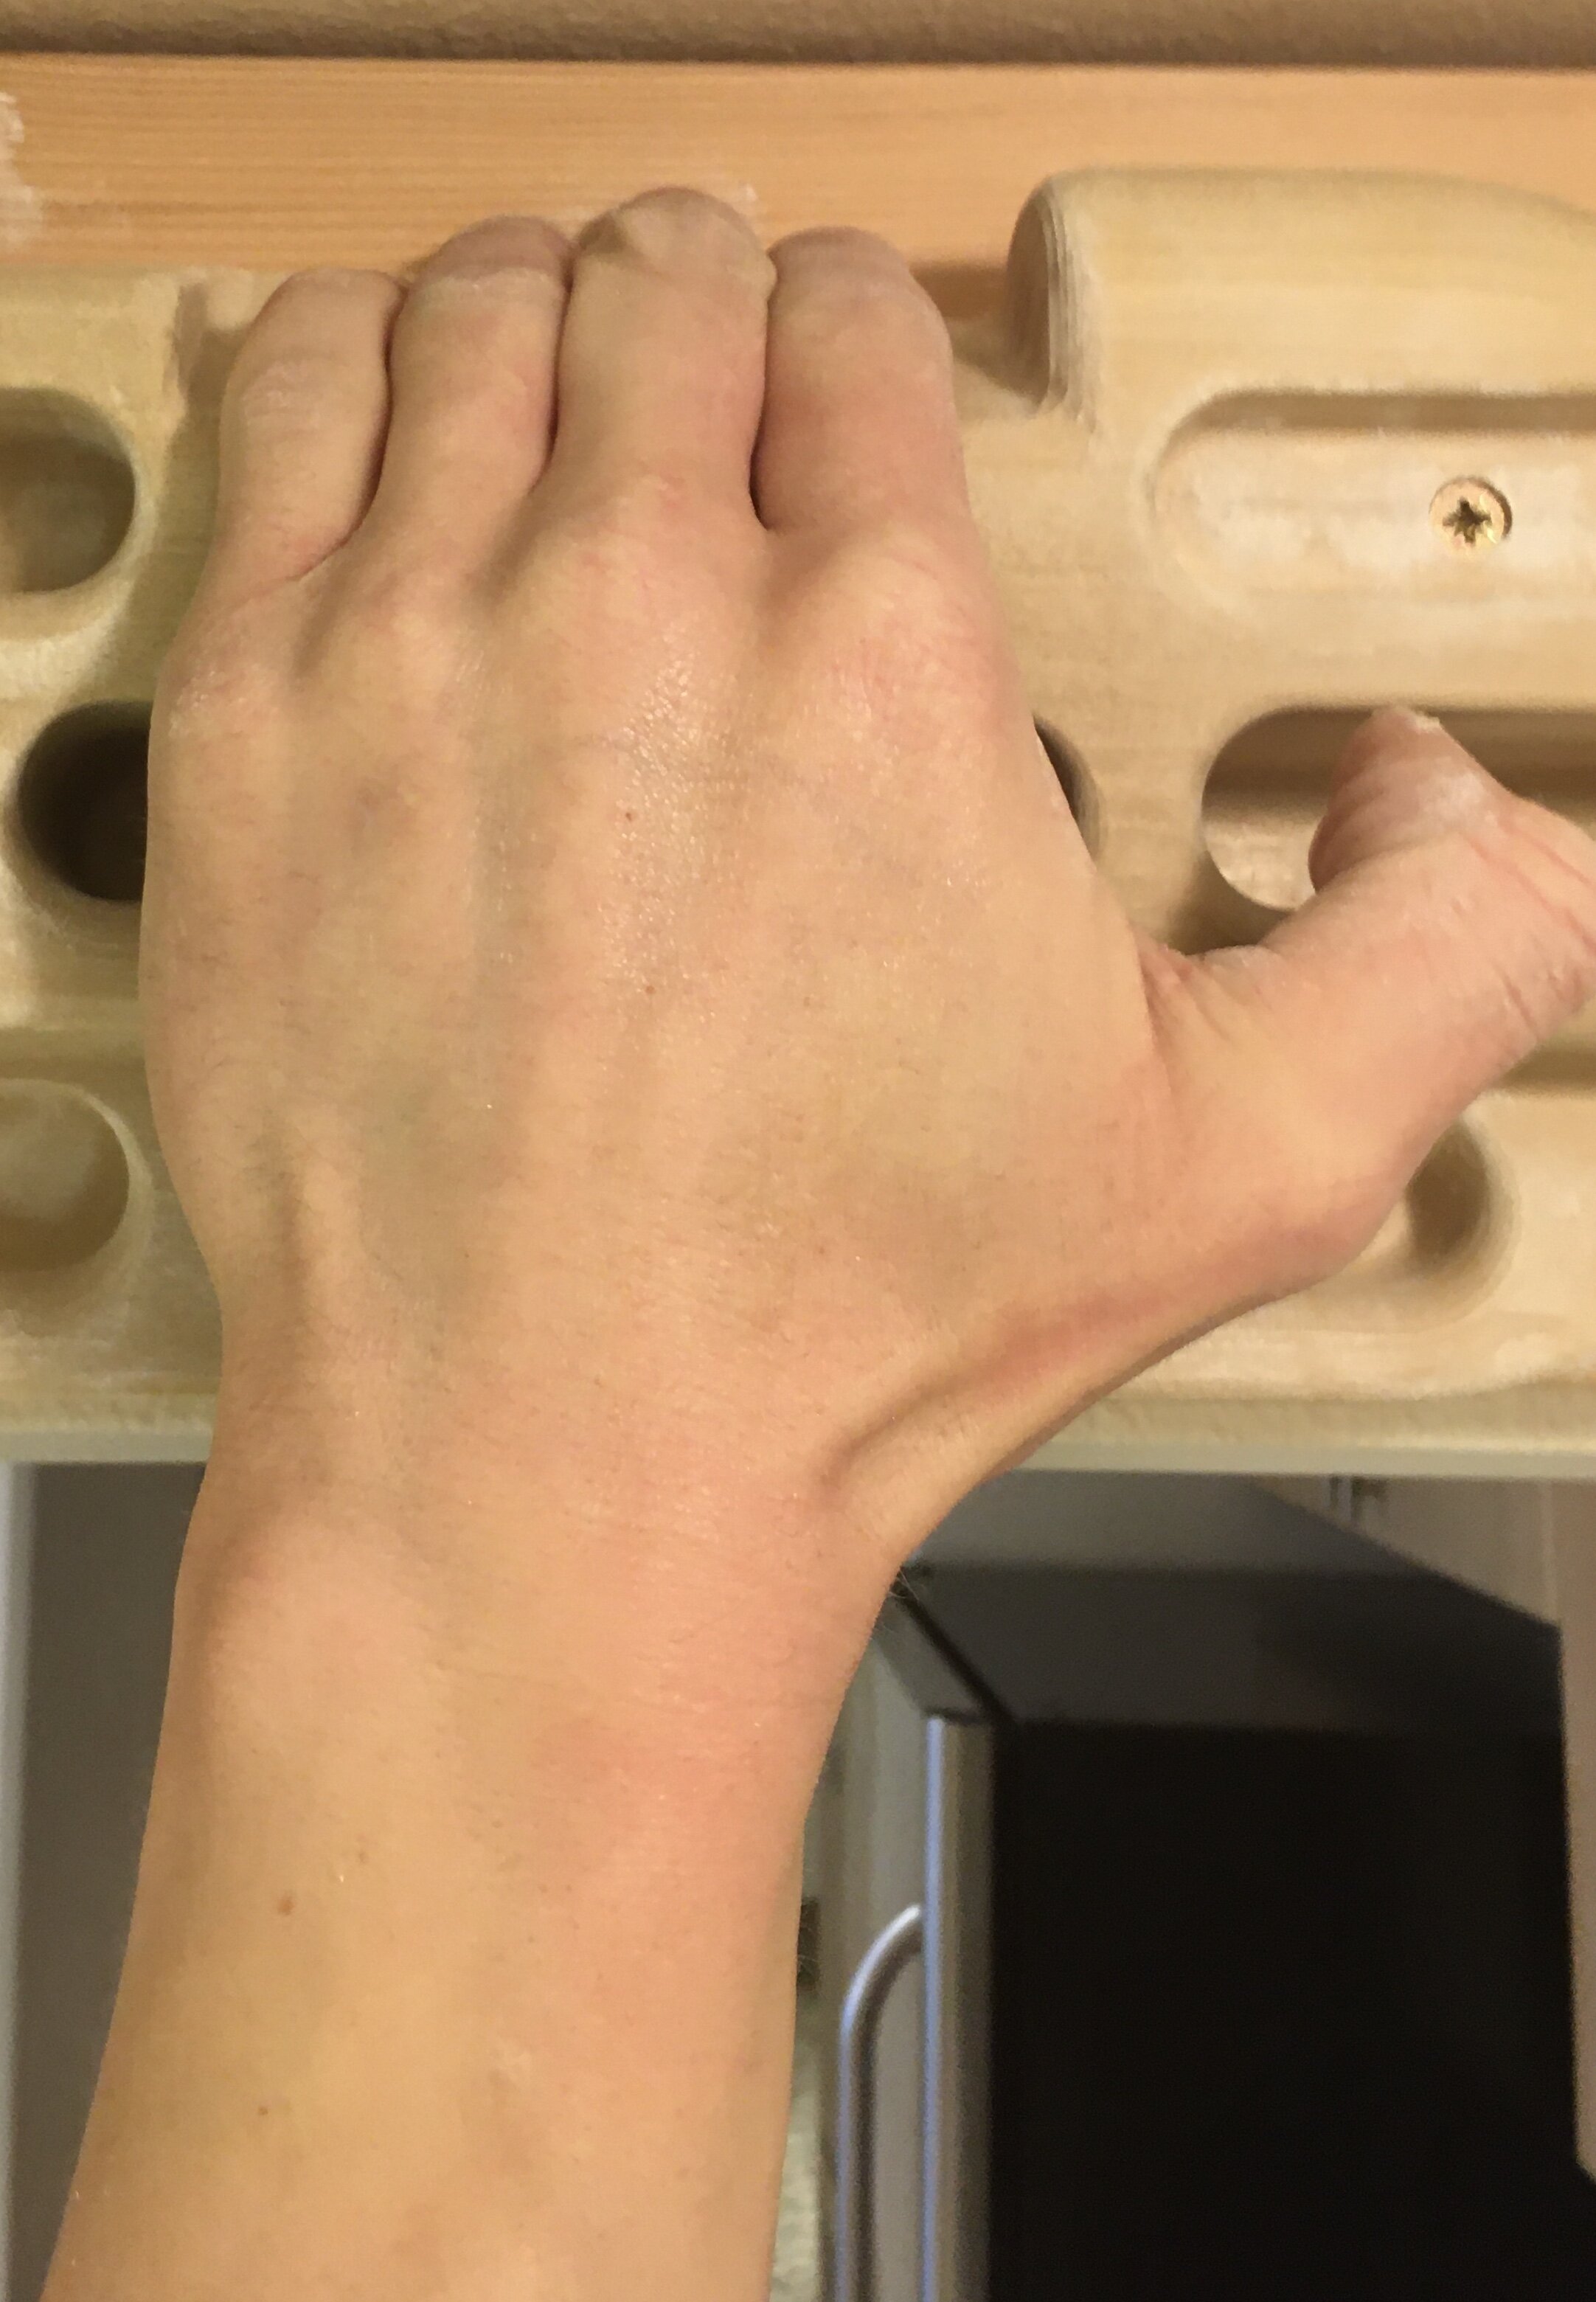
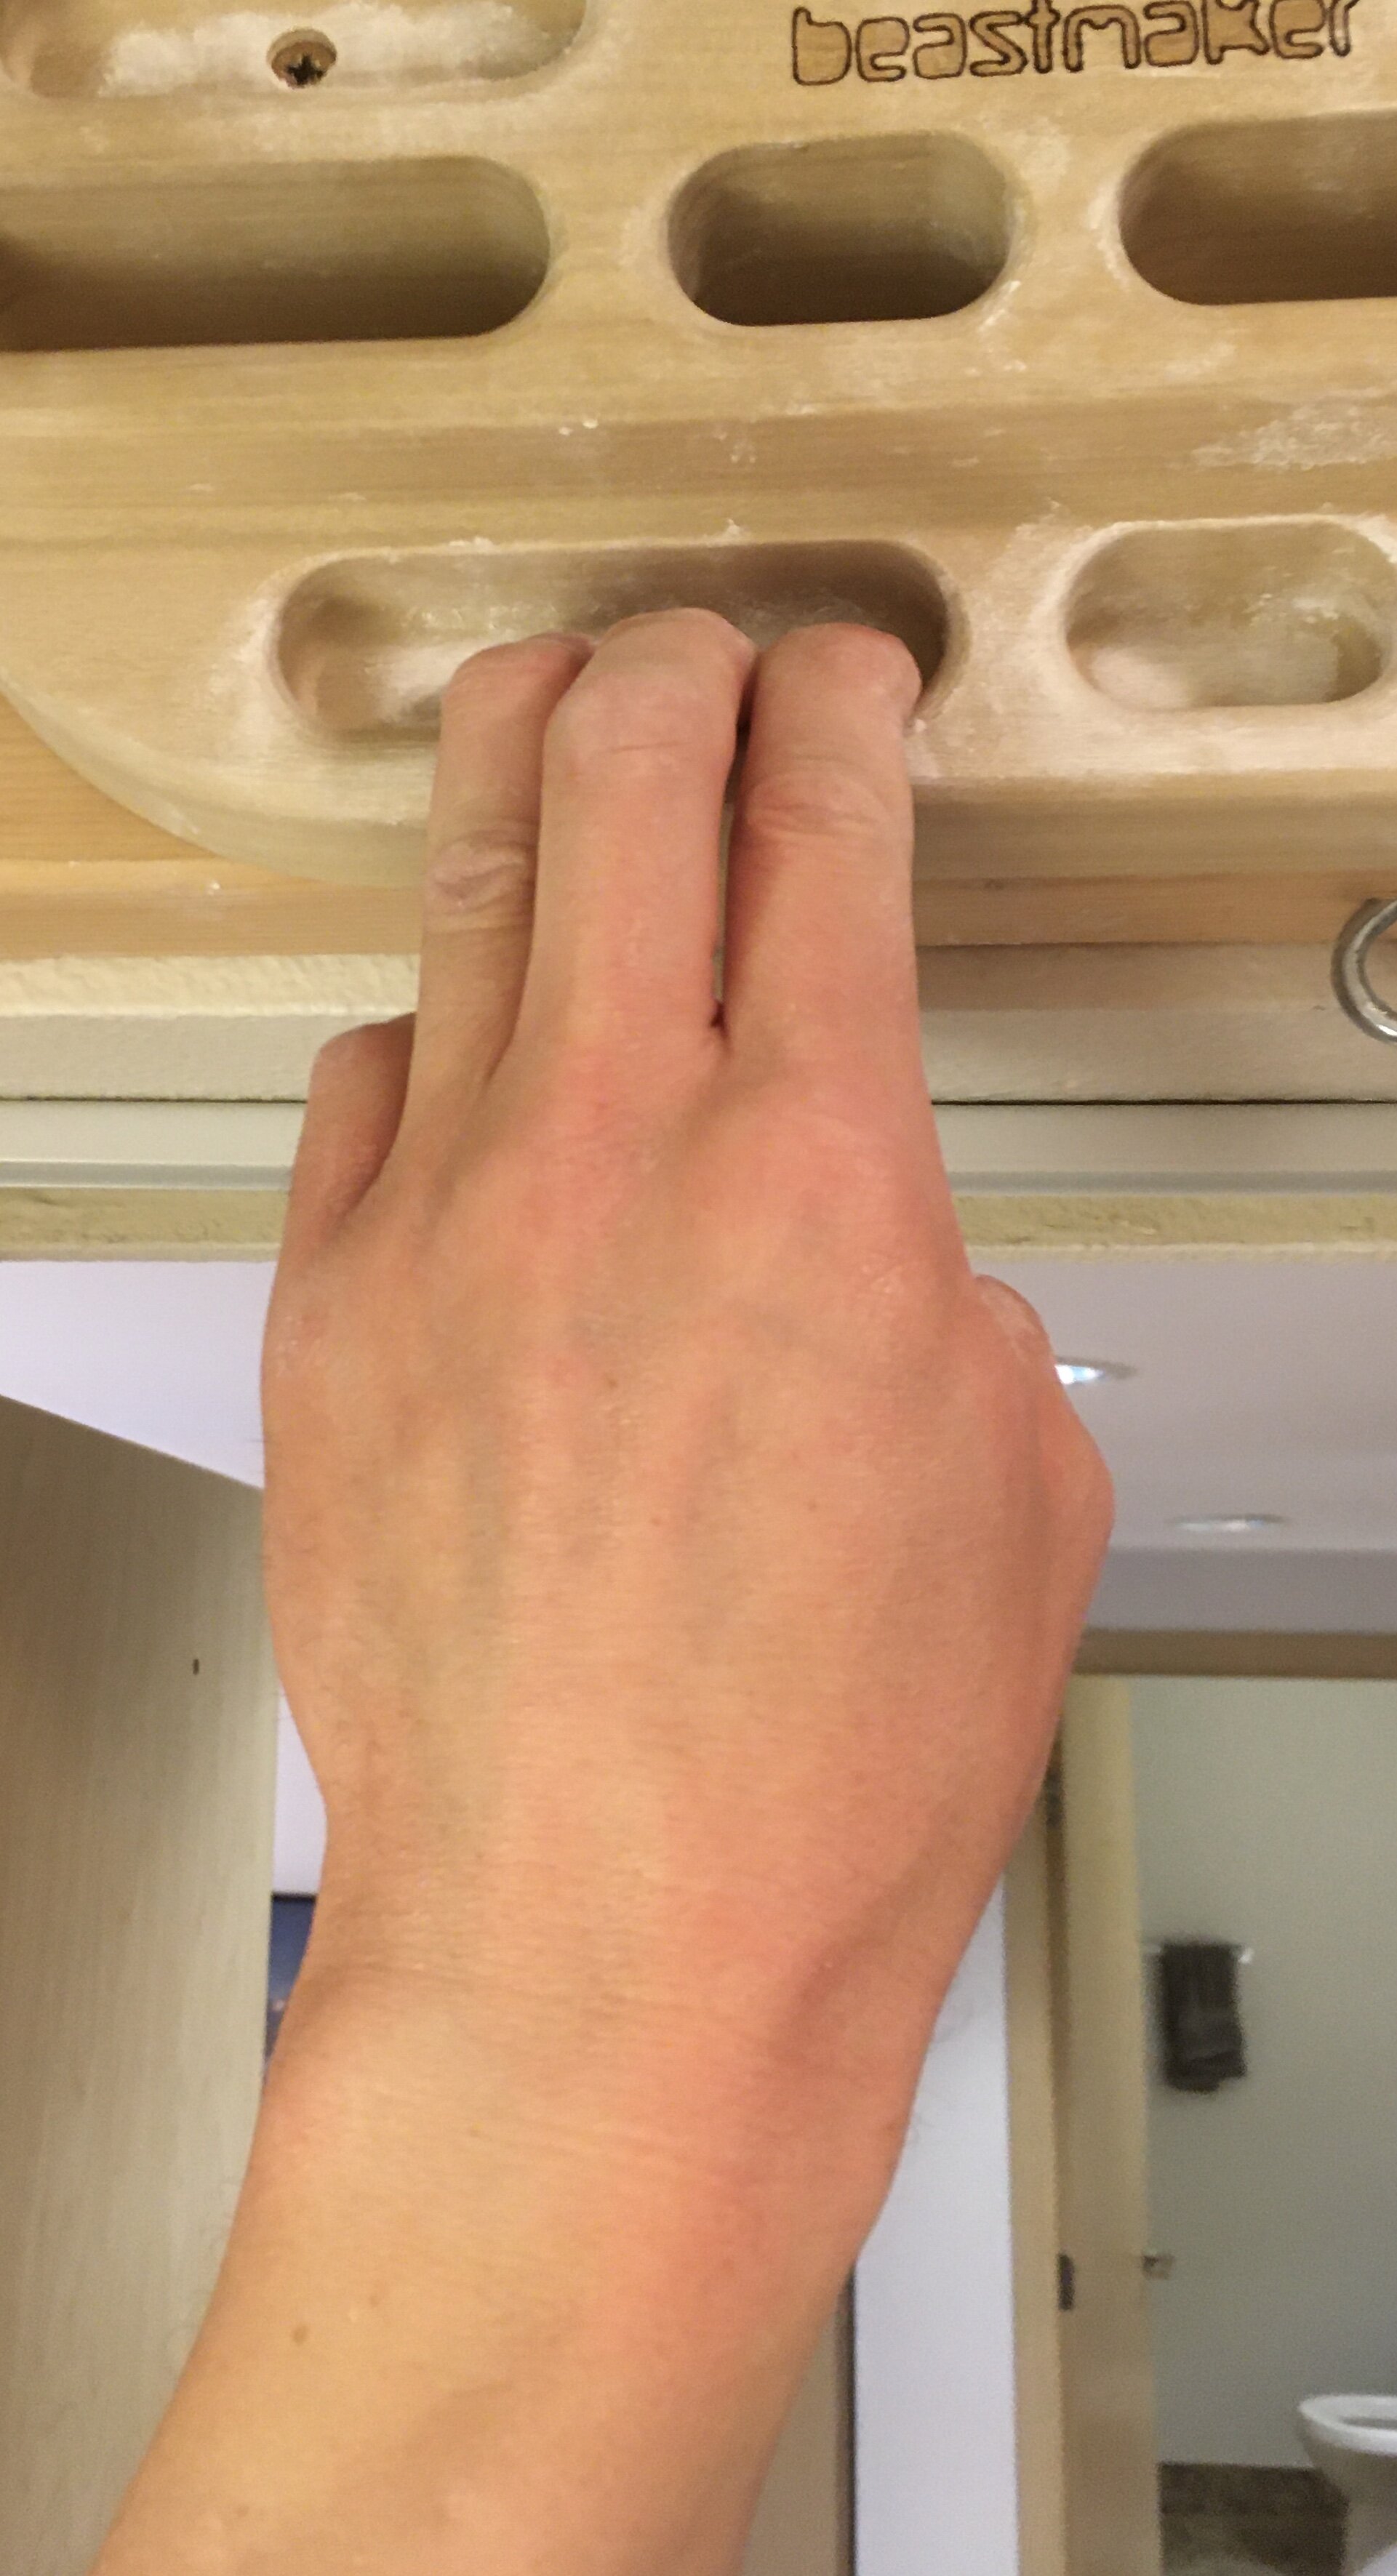
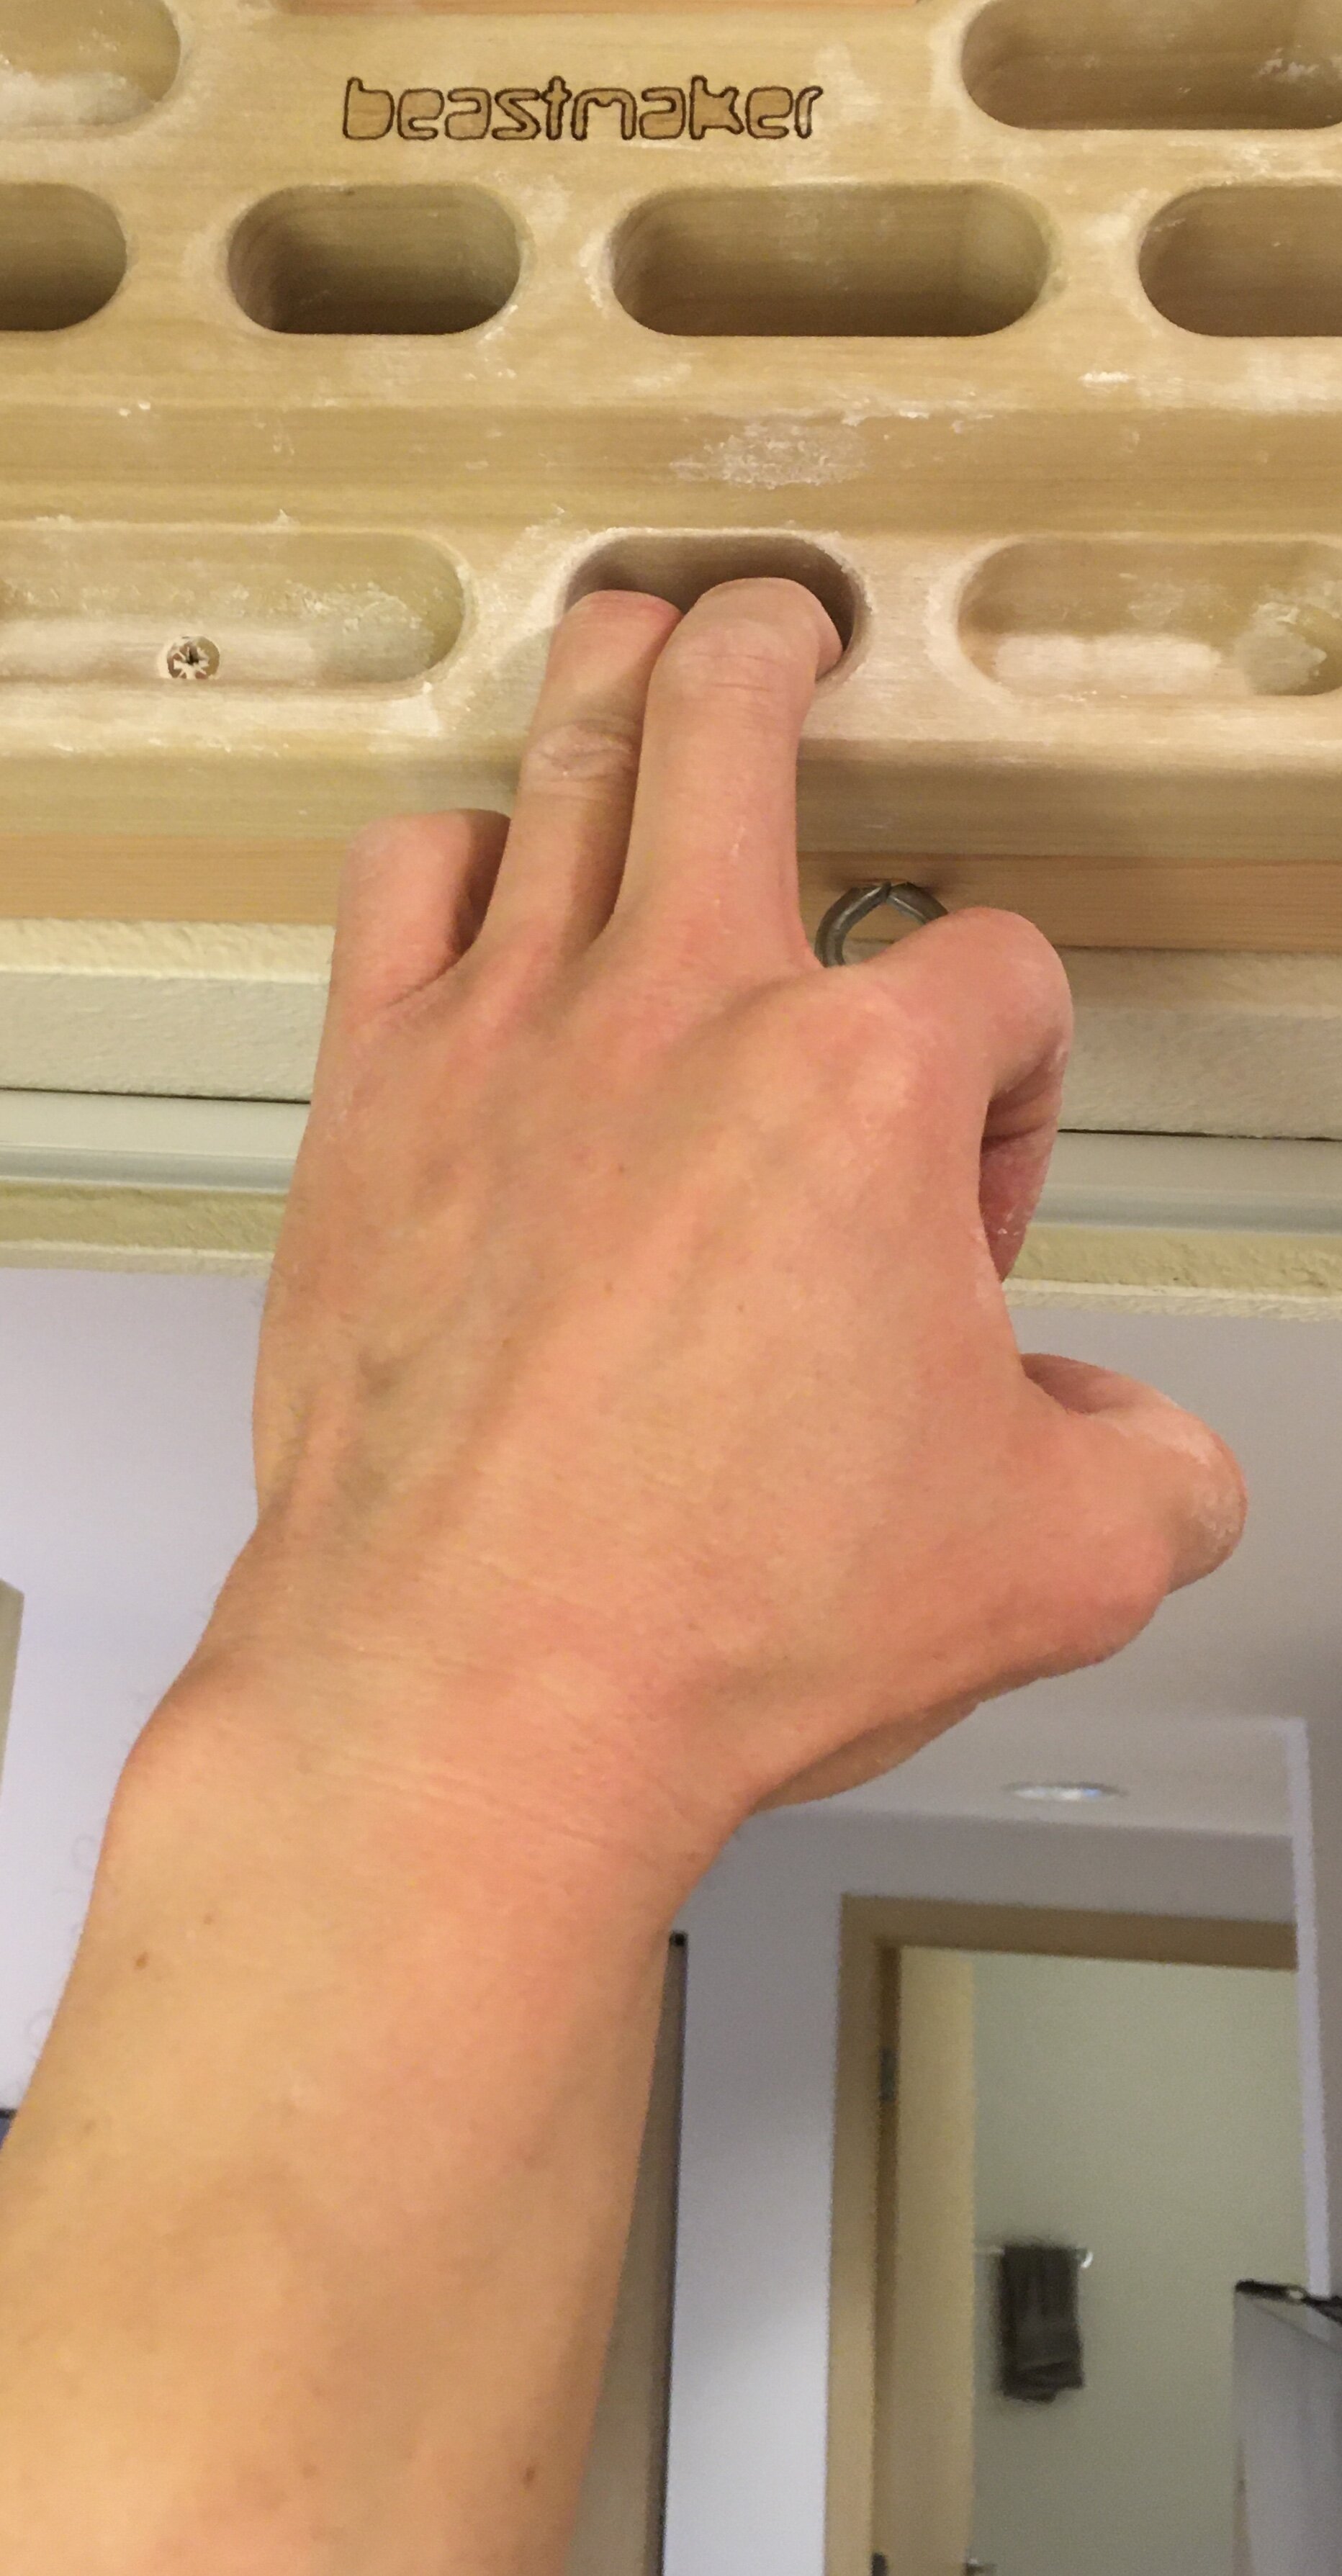
As you hang you’ll want to train different grips (pictured below). The most important grips to train are the open handed grip and the half crimp. The open handed grip is the least stressful on your fingers. The half crimp is a little more stressful, so progress the load on this gradually. It is generally recommended to avoid training a full-crimp position, which is like the half-crimp position but the thumb wraps over the index finger. Also experiment with slopers, 3 finger grips, 2 finger grips, and 1 finger grips. Some hangboards allow you to train a pinch (not pictured) which is a grip that involves the thumb.

Open
Open
Half Crimp
Half Crimp
Sloper
Sloper
3 Finger Drag
3 Finger Drag
2 Finger Pocket
2 Finger Pocket

Other Training Ideas

Getting bored with dead-hangs? There are lots of other things you can train on a hangboard. Try training a pull-up, knee raises, straight leg raises, toes-to-bar, front levers, one arm dead hangs, and one arm pull-ups. As always you can add or subtract weight as needed.

Important Tips

It takes muscles a few months to start getting stronger, but it takes years for the tendons and connective tissues of your fingers to start adapting to training. It’s very important to be gradual the first year you hangboard to avoid overuse injuries. Be sure to keep a training log to track the weights you are using. You will begin to see improvements in your strength over time.

Also never forget to warm up before you hangboard. At home, you can spend 10 minutes doing sub-maximal hangs and pull-ups to get your fingers and shoulders warmed up.

Most importantly, keep your workouts fun so you stick with it. With consistent work you might find that you are a stronger climber when the crags and gyms open up again. Good luck!

-Scott McAmis, DPT, OCS, CMPT

References

Anderson ML, Anderson ML. The Rock Climber’s Training Manual: A Guide to Continuous Improvement. Boulder, CO: Fixed Pin Publishing; 2014.

Horst EJ. Training for Climbing: The Definitive Guide to Improving Your Climbing Performance. Guilford, CT: Falcon Guides; 2002

Pincus M. Comparing Hangboard Protocols. Training Beta Website.

https://www.trainingbeta.com/comparing-hangboard-protocols/. Published January 5th, 2018. Accessed April 17th, 2020.

In Climbing Tags Rock Climbing, Training, Injury Prevention

How To Select A Pair Of Running Shoes

November 11, 2019

Asics. Brooks. Saucony. Nike. Hoka One One. Altra. The number of running shoe manufacturers we have access to is extensive. And with each running shoe produced, a hopeful declaration is made to the customer: run faster, hurt less, go farther. So how do we sift through the myriad of options and settle on the best running shoe for us? Here are a few helpful tips:

  • Comfort is key

    • Millions of dollars have been spent researching and developing systems to help individuals select the perfect running shoe for them, within a particular line. Have you ever stood on a fancy pressure sensor at a shoe store geared at helping you pick out a shoe? This is in that vein. While this is not necessarily a bad thing, it may not be adding any value. Researchers have concluded that the best predictor of a running shoe being appropriate for the individual does not require fancy foot scans or pressure maps. Rather, the best predictor of a running shoe being appropriate for an individual is comfort. So simple. By in large, if you are attempting to decide between two different running shoes, evidence suggests the one that is more comfortable is the better option for you.

  • Know the lingo

    • Do you know the difference between a stability shoe, a neutral shoe, and a minimalist shoe? Do you know what heel-toe drop refers to? Knowing the vocabulary and relevant measures within the running shoe industry can help you make more informed choices for yourself. For instance, a stability shoe aims to limit excessive foot motion during the running cycle, while a neutral shoe alternatively aims to maximize cushion. A minimalist shoe attempts to reduce the weight of the shoe in hopes of improving running efficiency and, subsequently, speed. Heel-toe drop refers to how much higher off of the ground your heel is as opposed to your toes when donning a running shoe. All of these are important factors to consider when selecting a running shoe, given that comfort still needs to come first.

  • Be a bit of a skeptic

    • While some running shoes are more popular than others, there is no one running shoe that has shown to be superior to others at reducing injury risk or vastly improving performance, despite advertising campaigns claiming otherwise. By in large, the overall rate of running-related injury is relatively the same regardless of footwear. However, some running shoe designs have higher rates of certain types of injury, with lower rates of others. For example, the barefoot running craze resulted in an increase in production of minimalist running shoes, with claims of reducing your injury risk. While some minimalist running shoes have been shown to reduce the risk of knee pain, this comes at the expense of an increased risk of Achilles tendinopathy and forefoot stress fractures. The reason? Running in a shoe with less cushioning tends to move our strike pattern to more of a mid or forefoot strike, reducing the impact force on our knee while increasing the load to our forefoot and Achilles. While the injury profile may be changed, the overall injury risk is the same. So, be a bit leery of any particular shoe manufacturer’s claim that a specific shoe in their line will dramatically reduce your injury risk.

  • Try on numerous pairs

    • Given that comfort is the most important factor in selecting an appropriate running shoe, it is integral that you try on a number of pairs of shoes from different manufacturers in order to find the best fit. Ordering running shoes online does not provide this opportunity. Even if you are purchasing the same line of shoes from a manufacturer, it is important to note that small changes can be made to the design and fit from year-to-year. And, your foot can change a bit over time. So, again, you must try on several pairs to find the best fit for you.

  • Focus on the fundamentals

    • While selecting an appropriate running shoe is an important component within a training program, the most significant factor related to injury and performance is your training program itself. No shoe will protect you if you are running too much or increasing your mileage or speed too rapidly. You must stick to the tried-and-true principles of training in order to set yourself up for success. In other words, regardless of your footwear, there are no shortcuts to the finish line.


Happy shopping!

-Grant Hennington, DPT


In Running Tags Running, Running Shoes, Injury Prevention, Training
Older Posts →

Upcoming Post

What To Expect From Your First PT Appointment

Previous Posts

Blog Archive

CONTACT

Phone: (206) 789-8869

Fax: (206) 789-8873

Email: info@salmonbaypt.com

LOCATIONS

Powered by Squarespace