• Home
    • Our Team
    • Our Values
    • Careers
    • What We Treat
    • How We Treat
    • Testimonials
    • Insurance
    • Pay Your Bill
    • FAQ
    • COVID-19
    • Performance Hubs
    • Health & Wellness
    • 3D Motion Capture Lab
  • Locations
  • Blog
  • Ask A PT
  • Appointments
Menu

Salmon Bay Physical Therapy

Seattle-Based Physical Therapy Practice, Serving Ballard and Fremont
  • Home
  • About
    • Our Team
    • Our Values
    • Careers
    • What We Treat
    • How We Treat
    • Testimonials
  • Patient Resources
    • Insurance
    • Pay Your Bill
    • FAQ
    • COVID-19
    • Performance Hubs
    • Health & Wellness
    • 3D Motion Capture Lab
  • Locations
  • Blog
  • Ask A PT
  • Appointments

SBPT Blog

Training For Climbing Season From Home

April 21, 2020

Climbing season may be on hold as we begin the spring in our homes, but even with the gyms and crags closed down, that doesn’t mean you have to stop training for climbing. Here are some tips for training at home on a hangboard.

Hangboarding 101

A hangboard is the most effective way to train for climbing at home. If you don’t already have one, there are lots of different premade hangboards available online. Pick a hangboard that has a variety of edges and grips. You want the holds to be challenging. Ideally the hangboard has several holds that you can just barely hang onto with your full body weight, and there should also be some holds that you can’t quite hang onto without unweighting yourself with a pulley.

Basic Setup

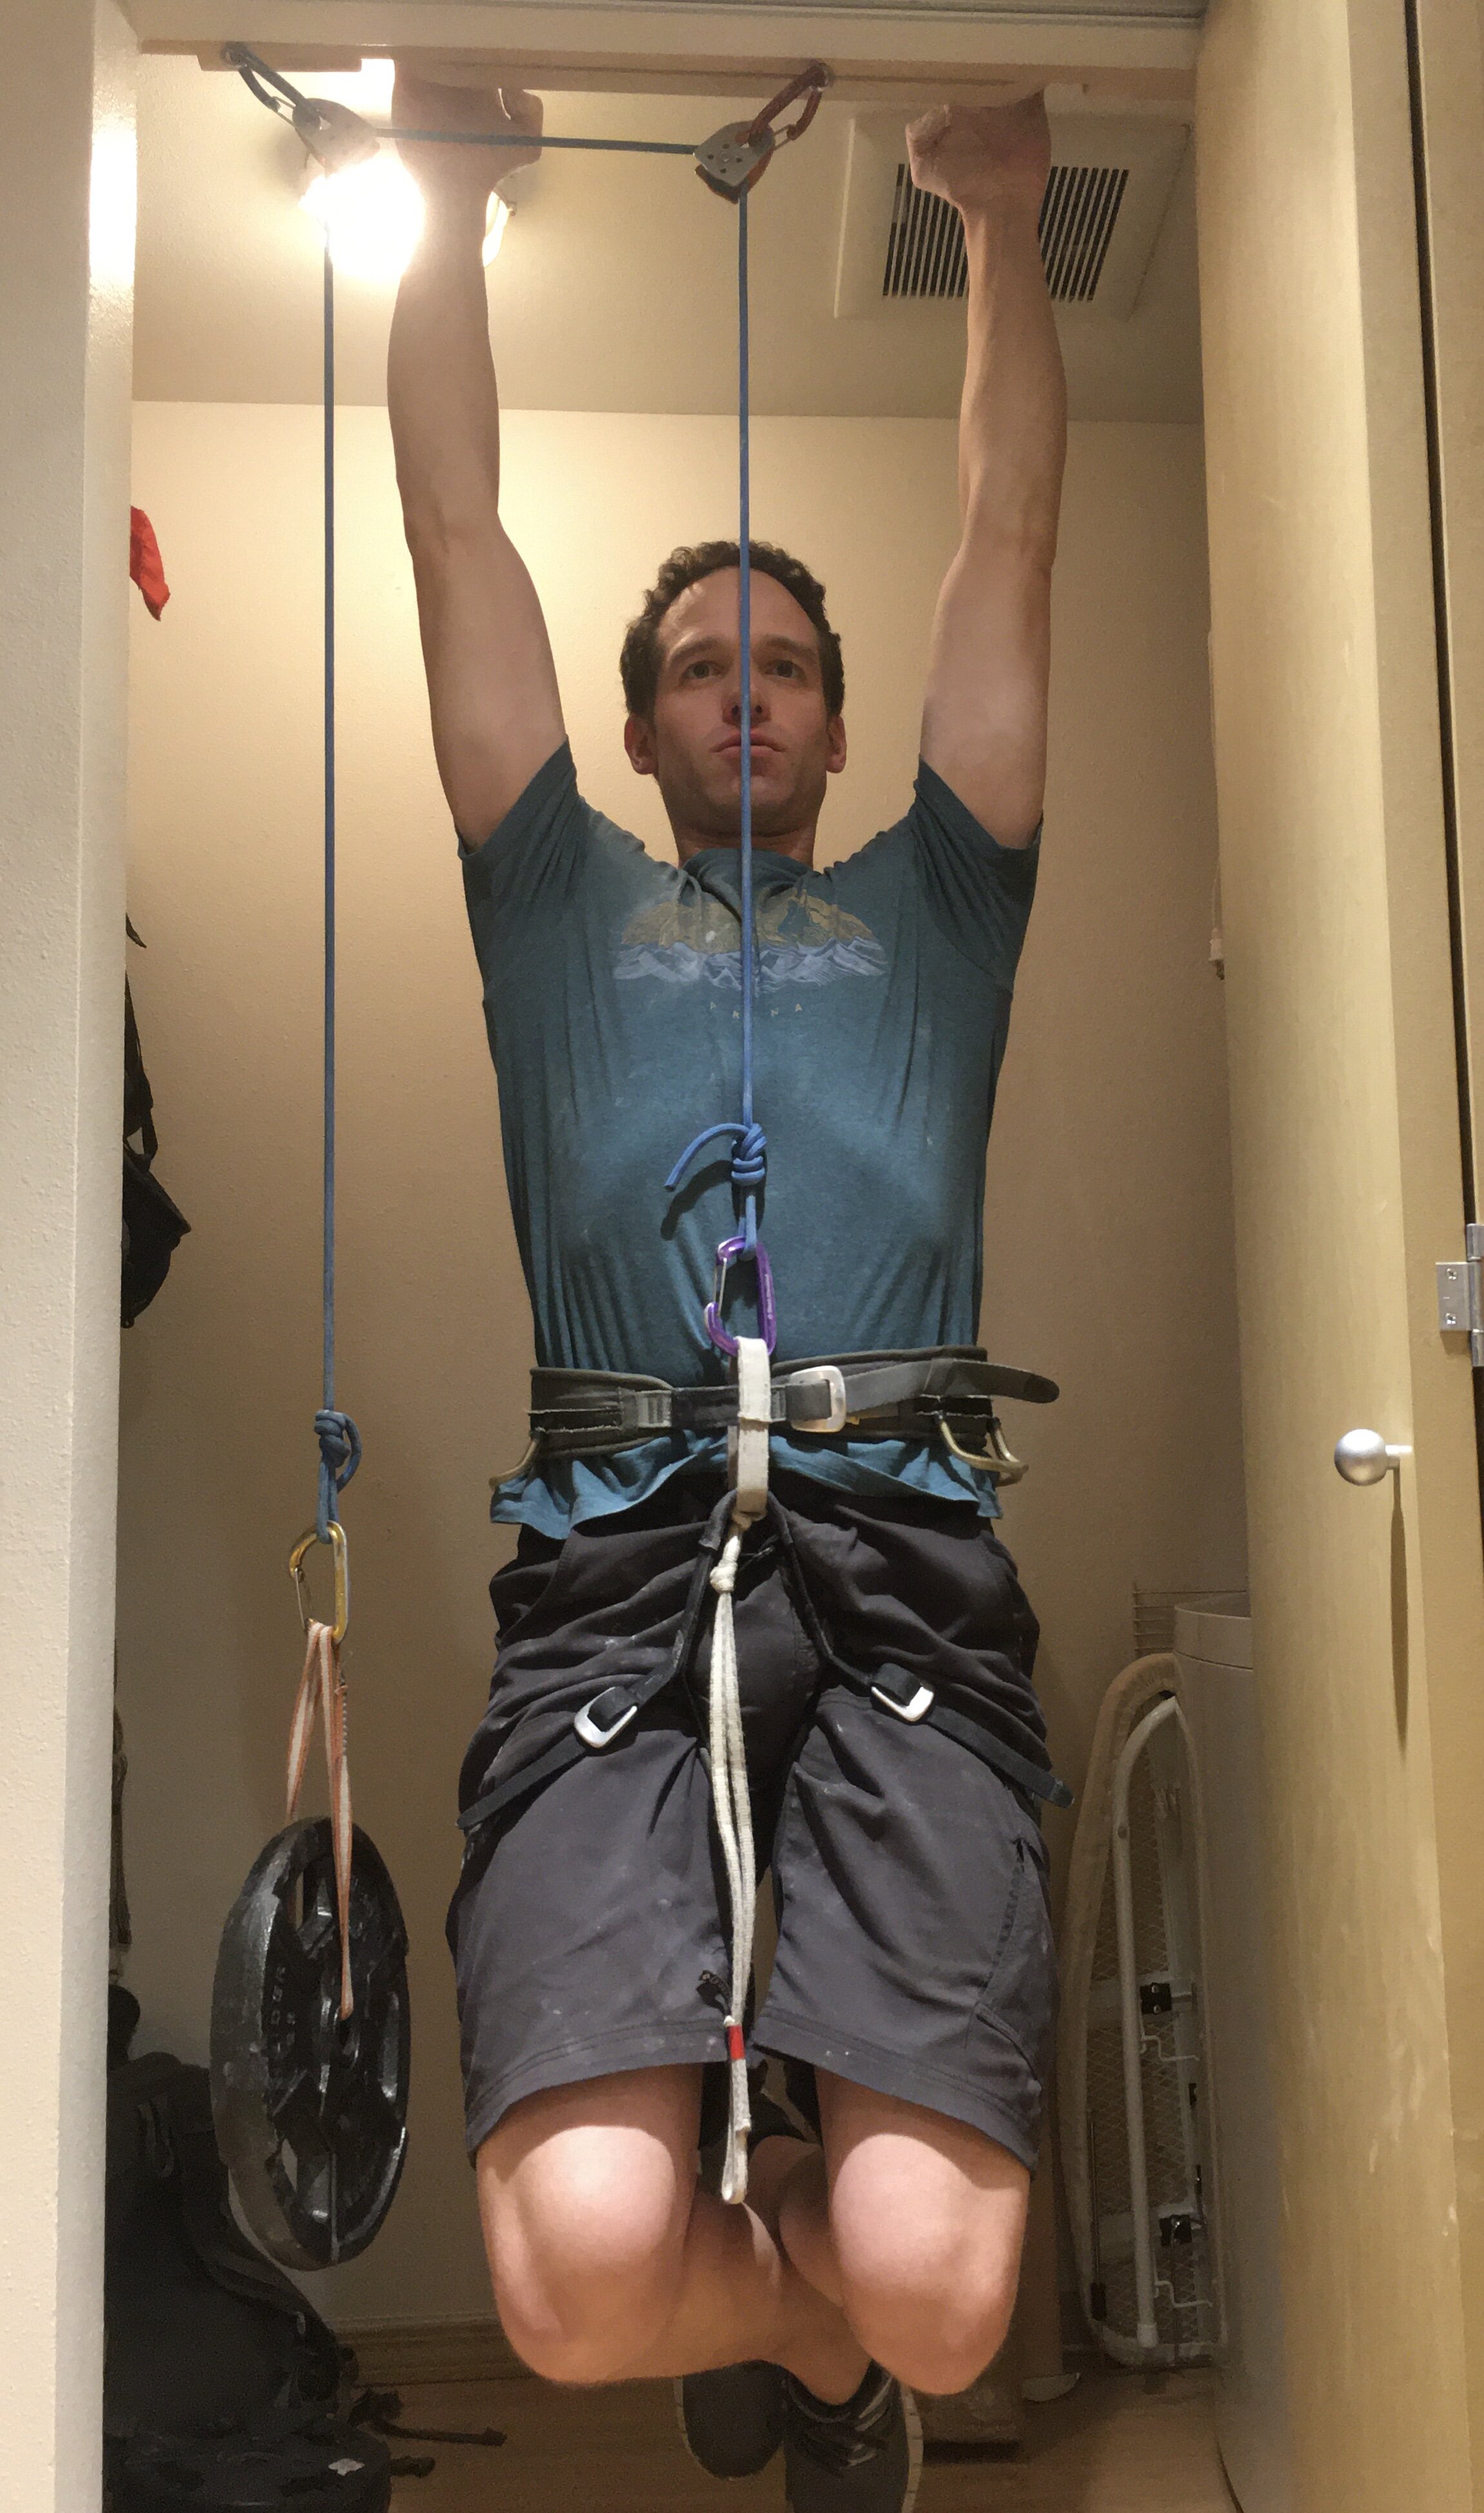
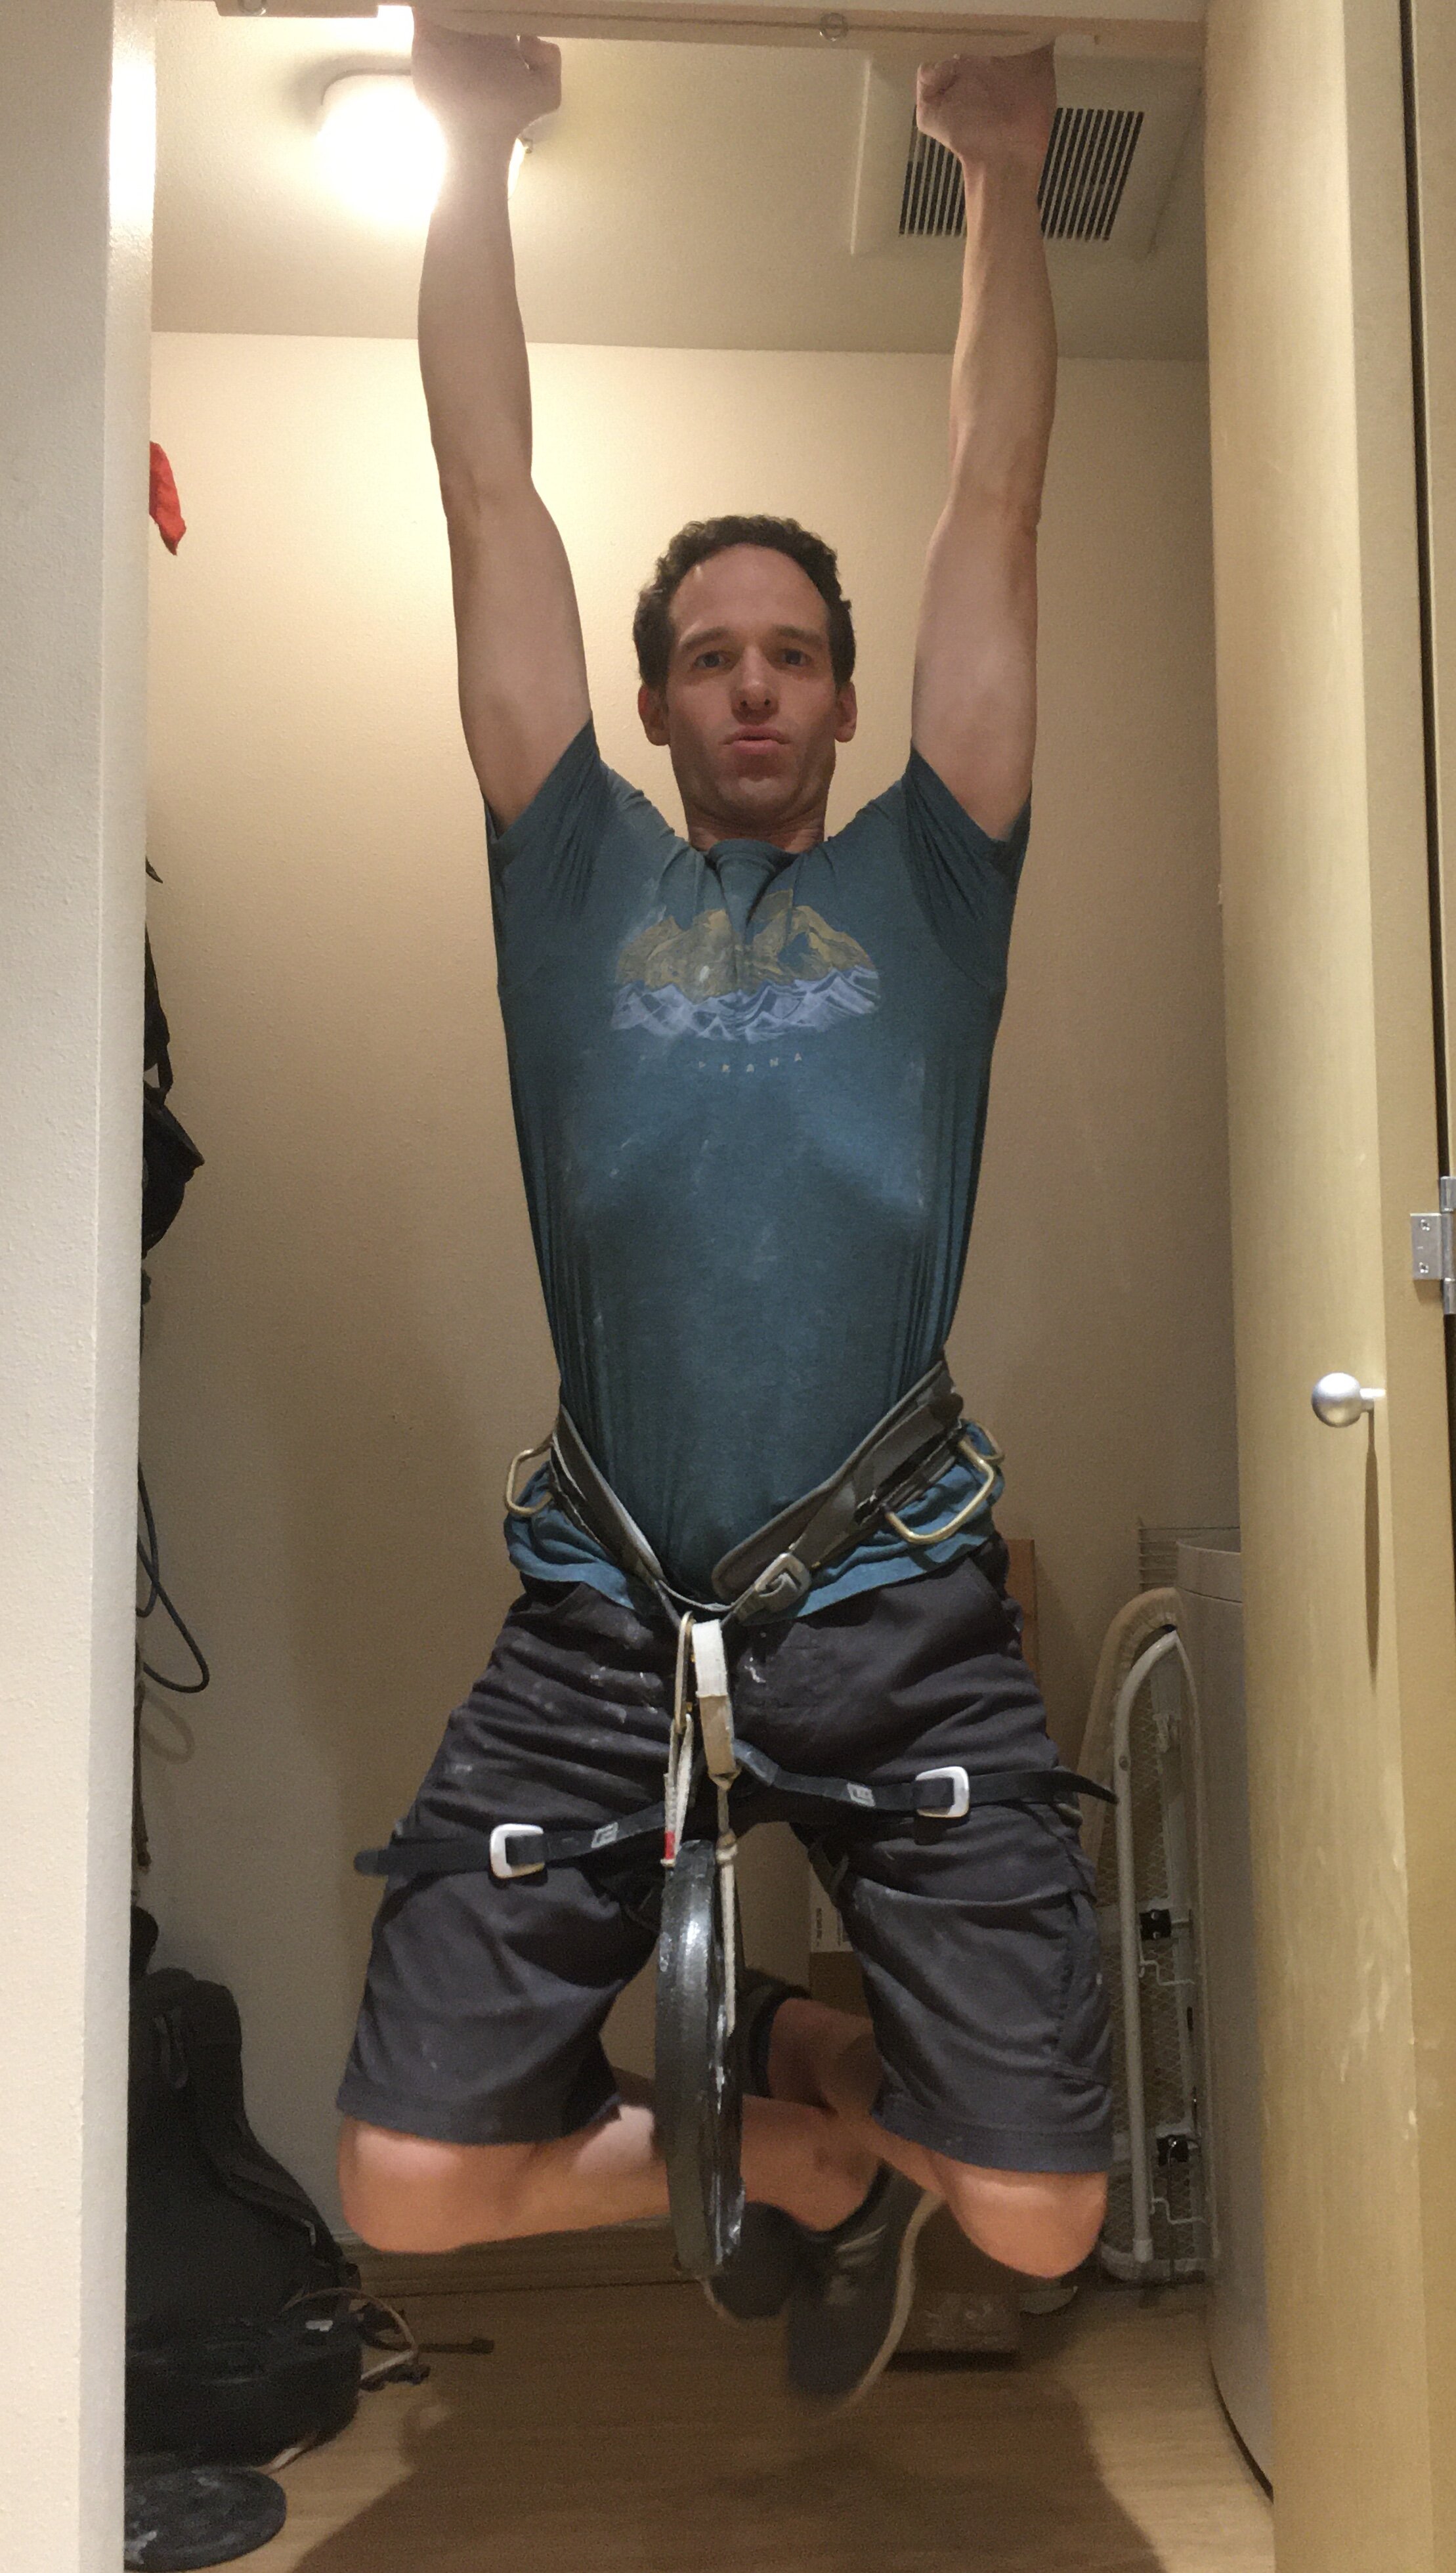
Install the hangboard over a doorframe or somewhere that you can hang freely. Typically you will mount the hangboard on a plywood mounting board which you can screw directly into the studs over the door frame. You’ll also want to add two pulleys underneath the hangboard to subtract weight when you hang. A cheap crevasse rescue pulley works fine attached with a carabiner, and you can use eye bolts to attach the pulley/carabiner to the underside of the hangboard.

Hangboard Setup

Hangboard Setup

Basic Hangboard Technique: The Dead-Hang

The most basic type of hangboard training that uses your body weight is the dead-hang. With the dead-hang, you’re not trying to do a pull-up on the hangboard. You are simply trying to hang onto the hangboard for a short period of time. You should hang with engaged shoulder blades, meaning that there should be some room between your shoulders and your ears (don’t hang limp). Your elbows should be engaged too with the arm straight or slightly bent. Now pick an edge that is hard to hang on. Try to add weight to your harness or subtract weight through the pulleys so that you are near failure when you hang. 

Unweighted Hang
Unweighted Hang
Weighted Hang
Weighted Hang

Hangboard Protocols

There are a few different dead hang protocols that most climbers use. The “max hang” protocol is the simplest. It involves adding the maximum weight or subtracting the minimum weight that you can tolerate for a 10 second hang. Hang for 10 seconds and then recover for 3 minutes. Repeat this for 6-10 sets on different edges and grips. Max hangs are good for building overall strength.

Another popular protocol uses “repeaters.” Begin by adding or subtracting weight to your harness so you are near failure at the end. With repeaters, you do a timed hang followed by a brief rest, and you repeat this for several repetitions. The most common repeater timing is a 7 second hang followed by a 3 second rest repeated 6 times (this will add up to a minute of hangs and rests). Take a 3 minute recovery after doing repeaters, and then complete several more sets on different holds/grips. Repeaters help build strength, but also challenge your endurance a little bit too.
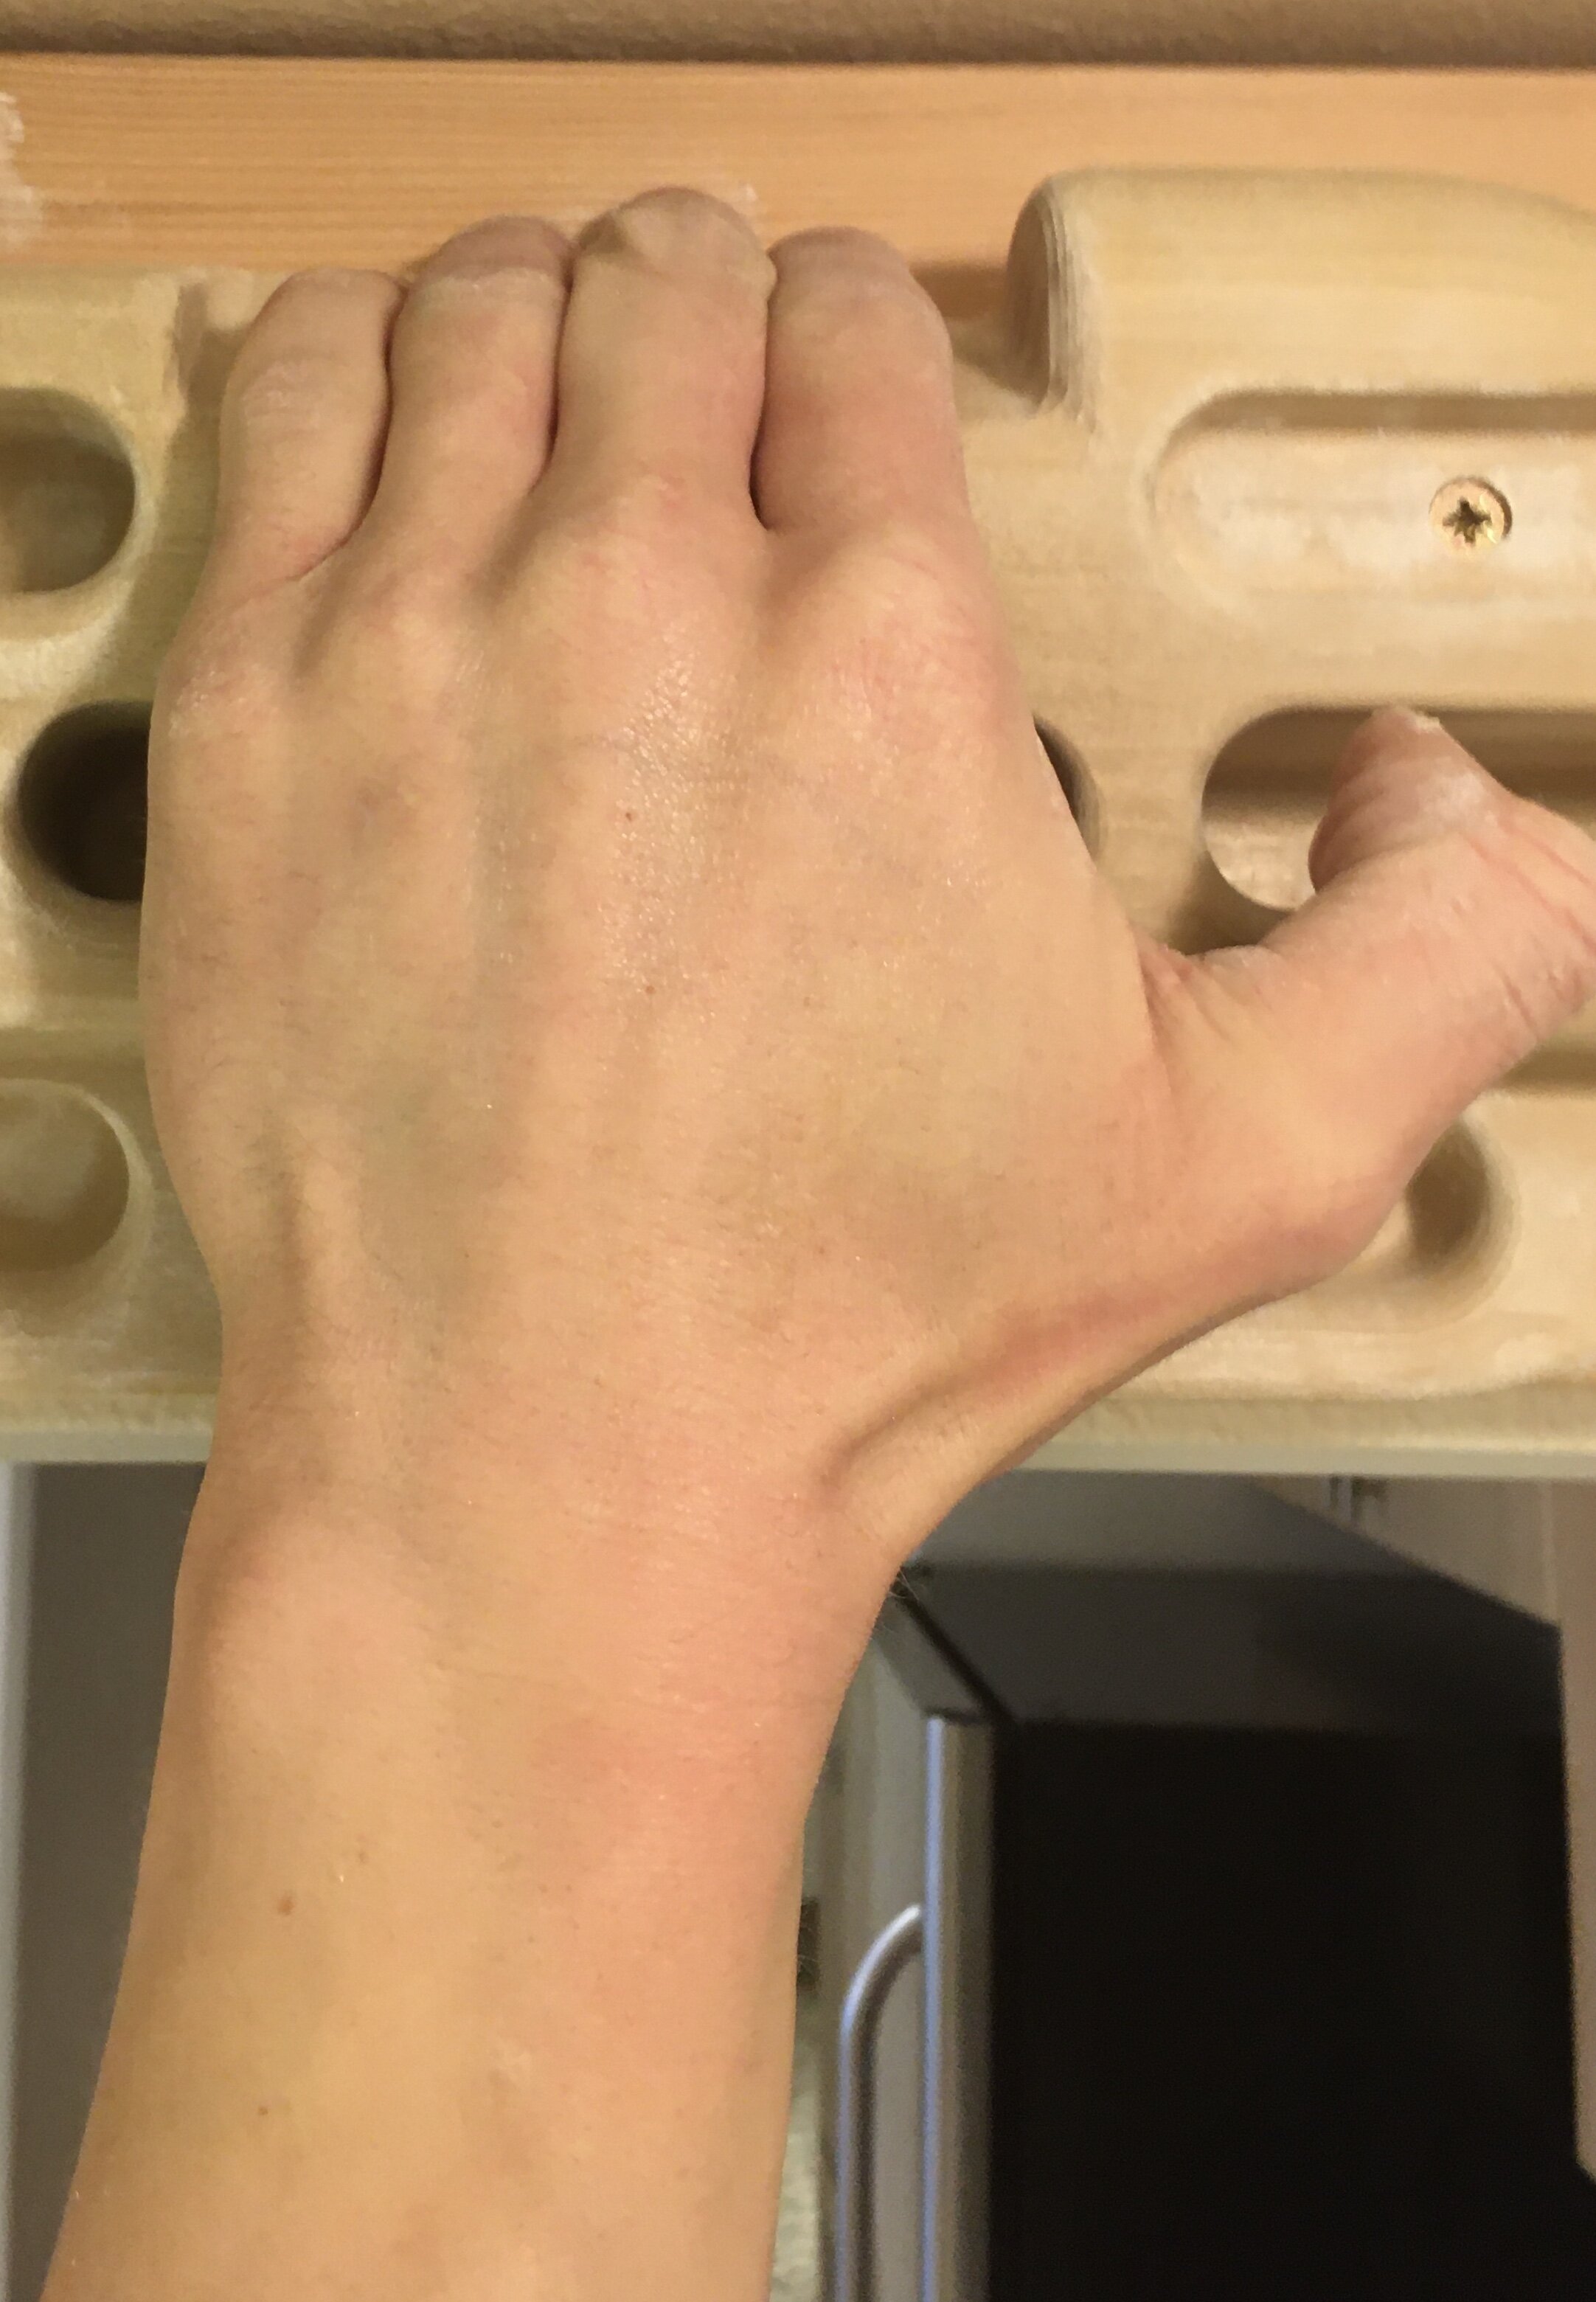
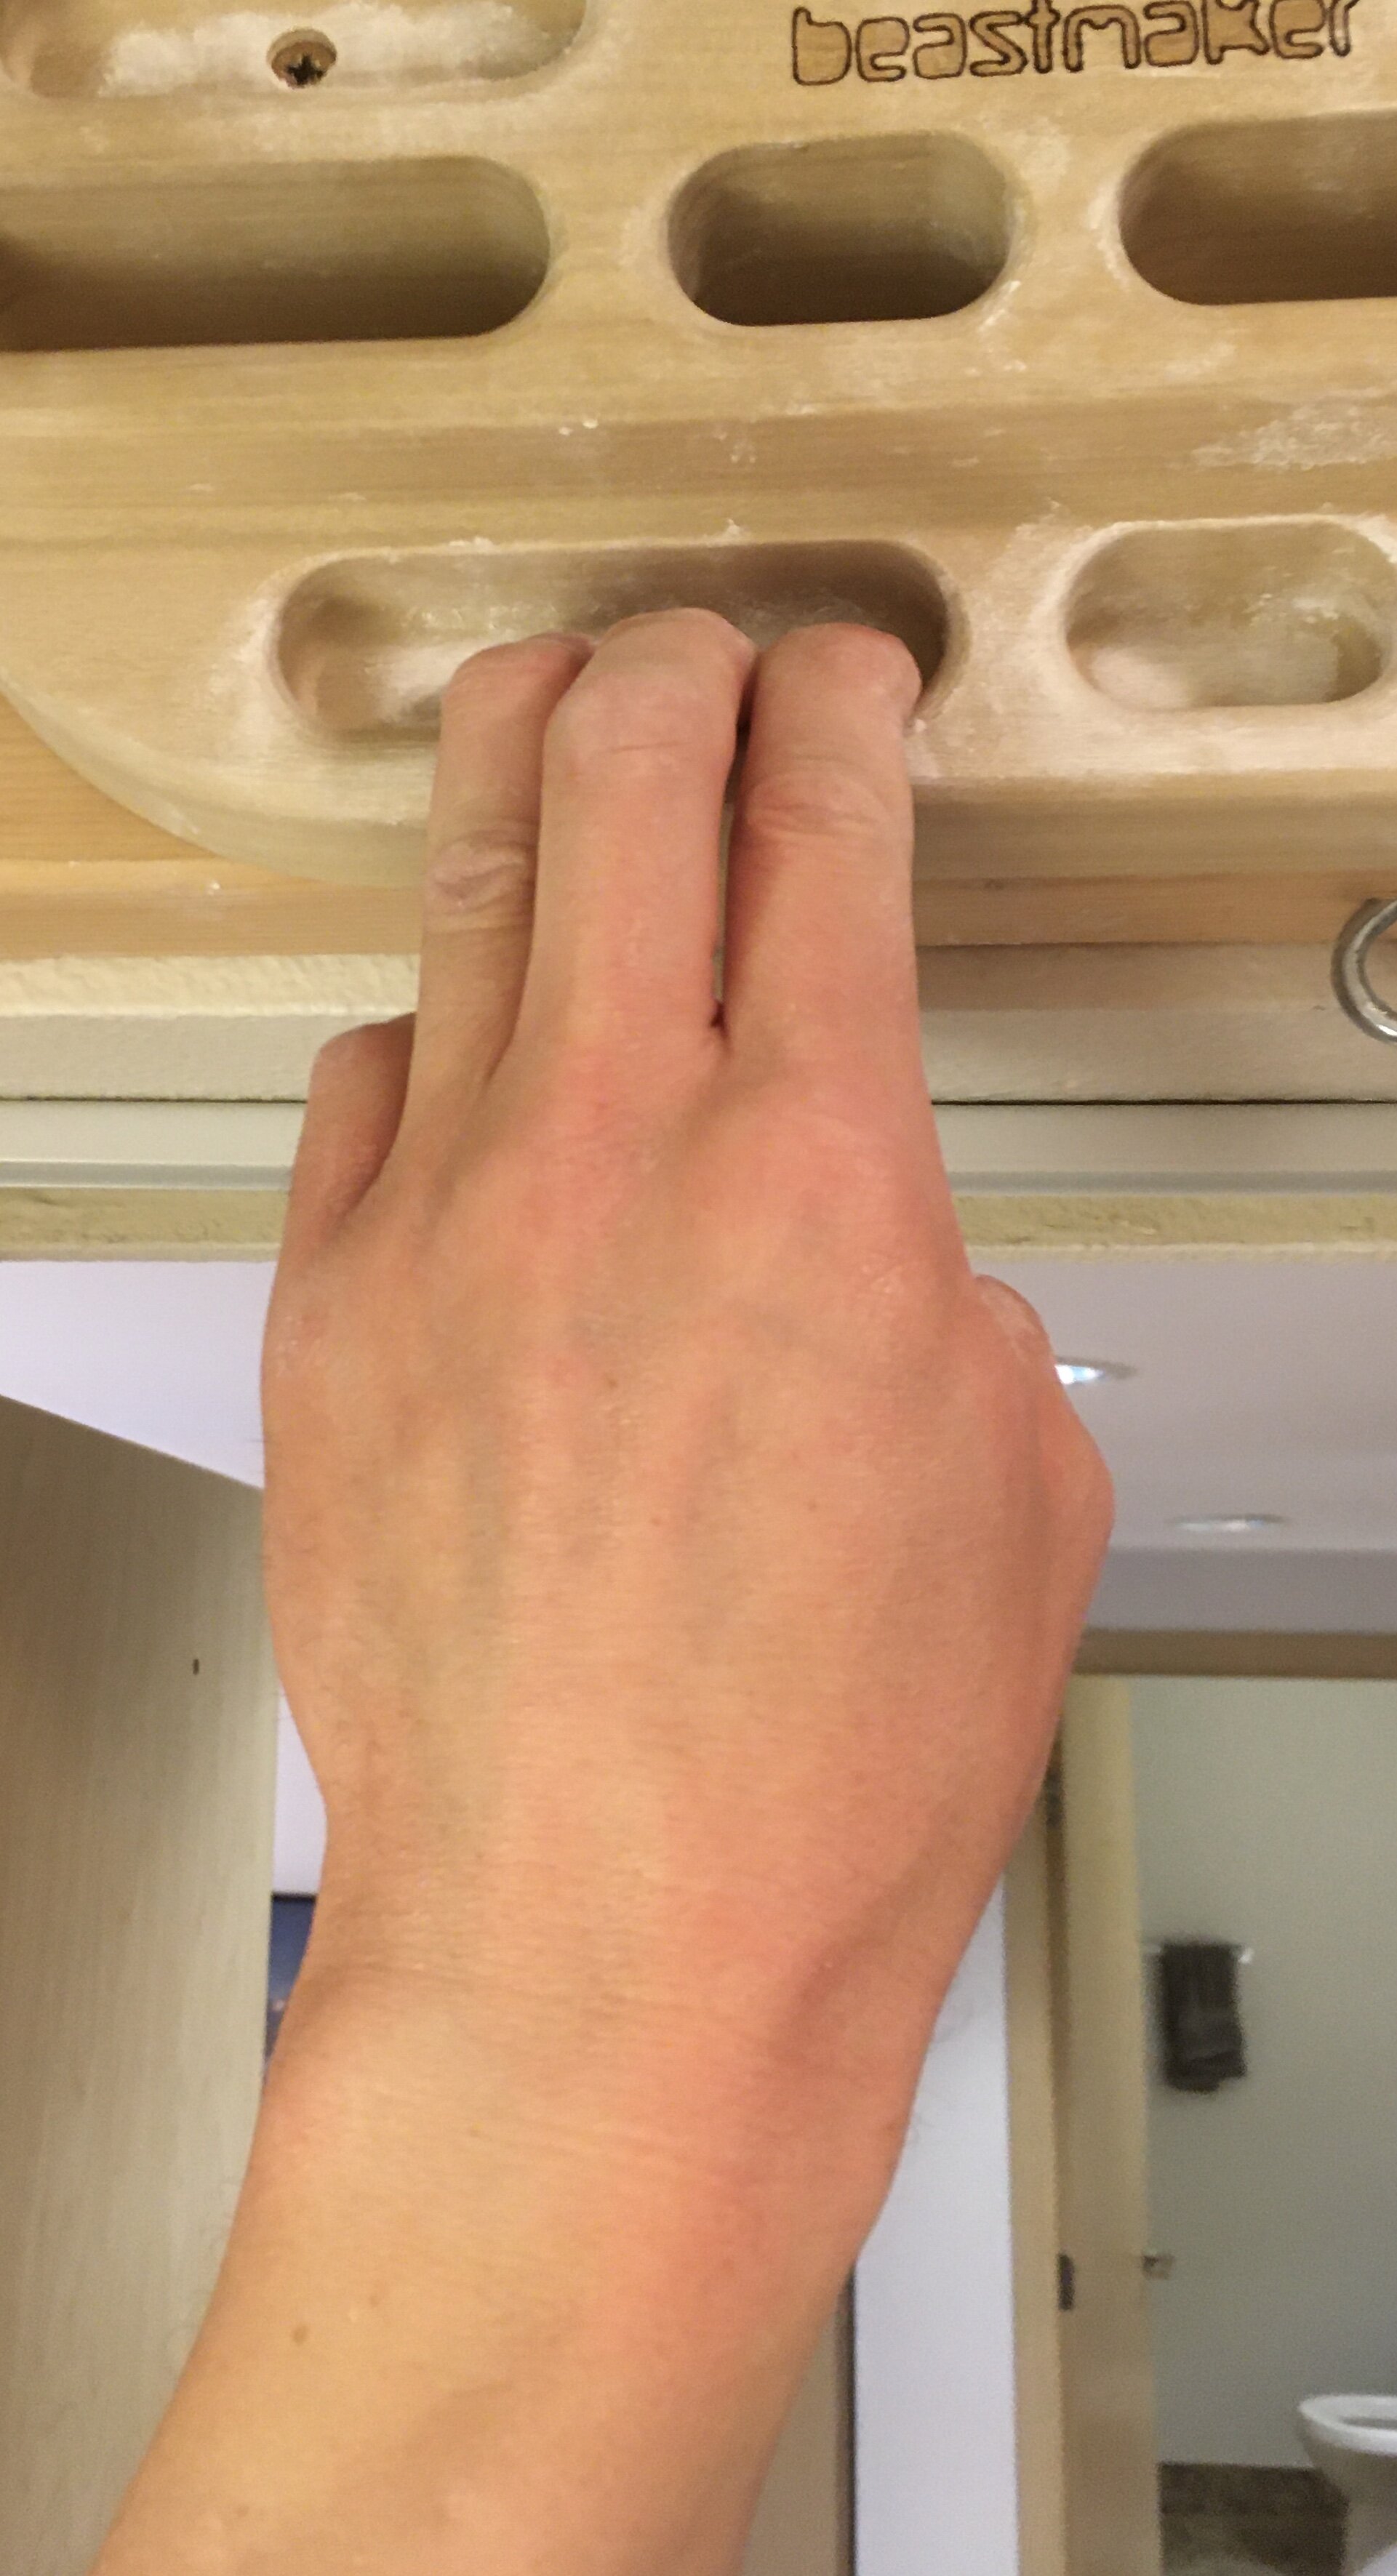
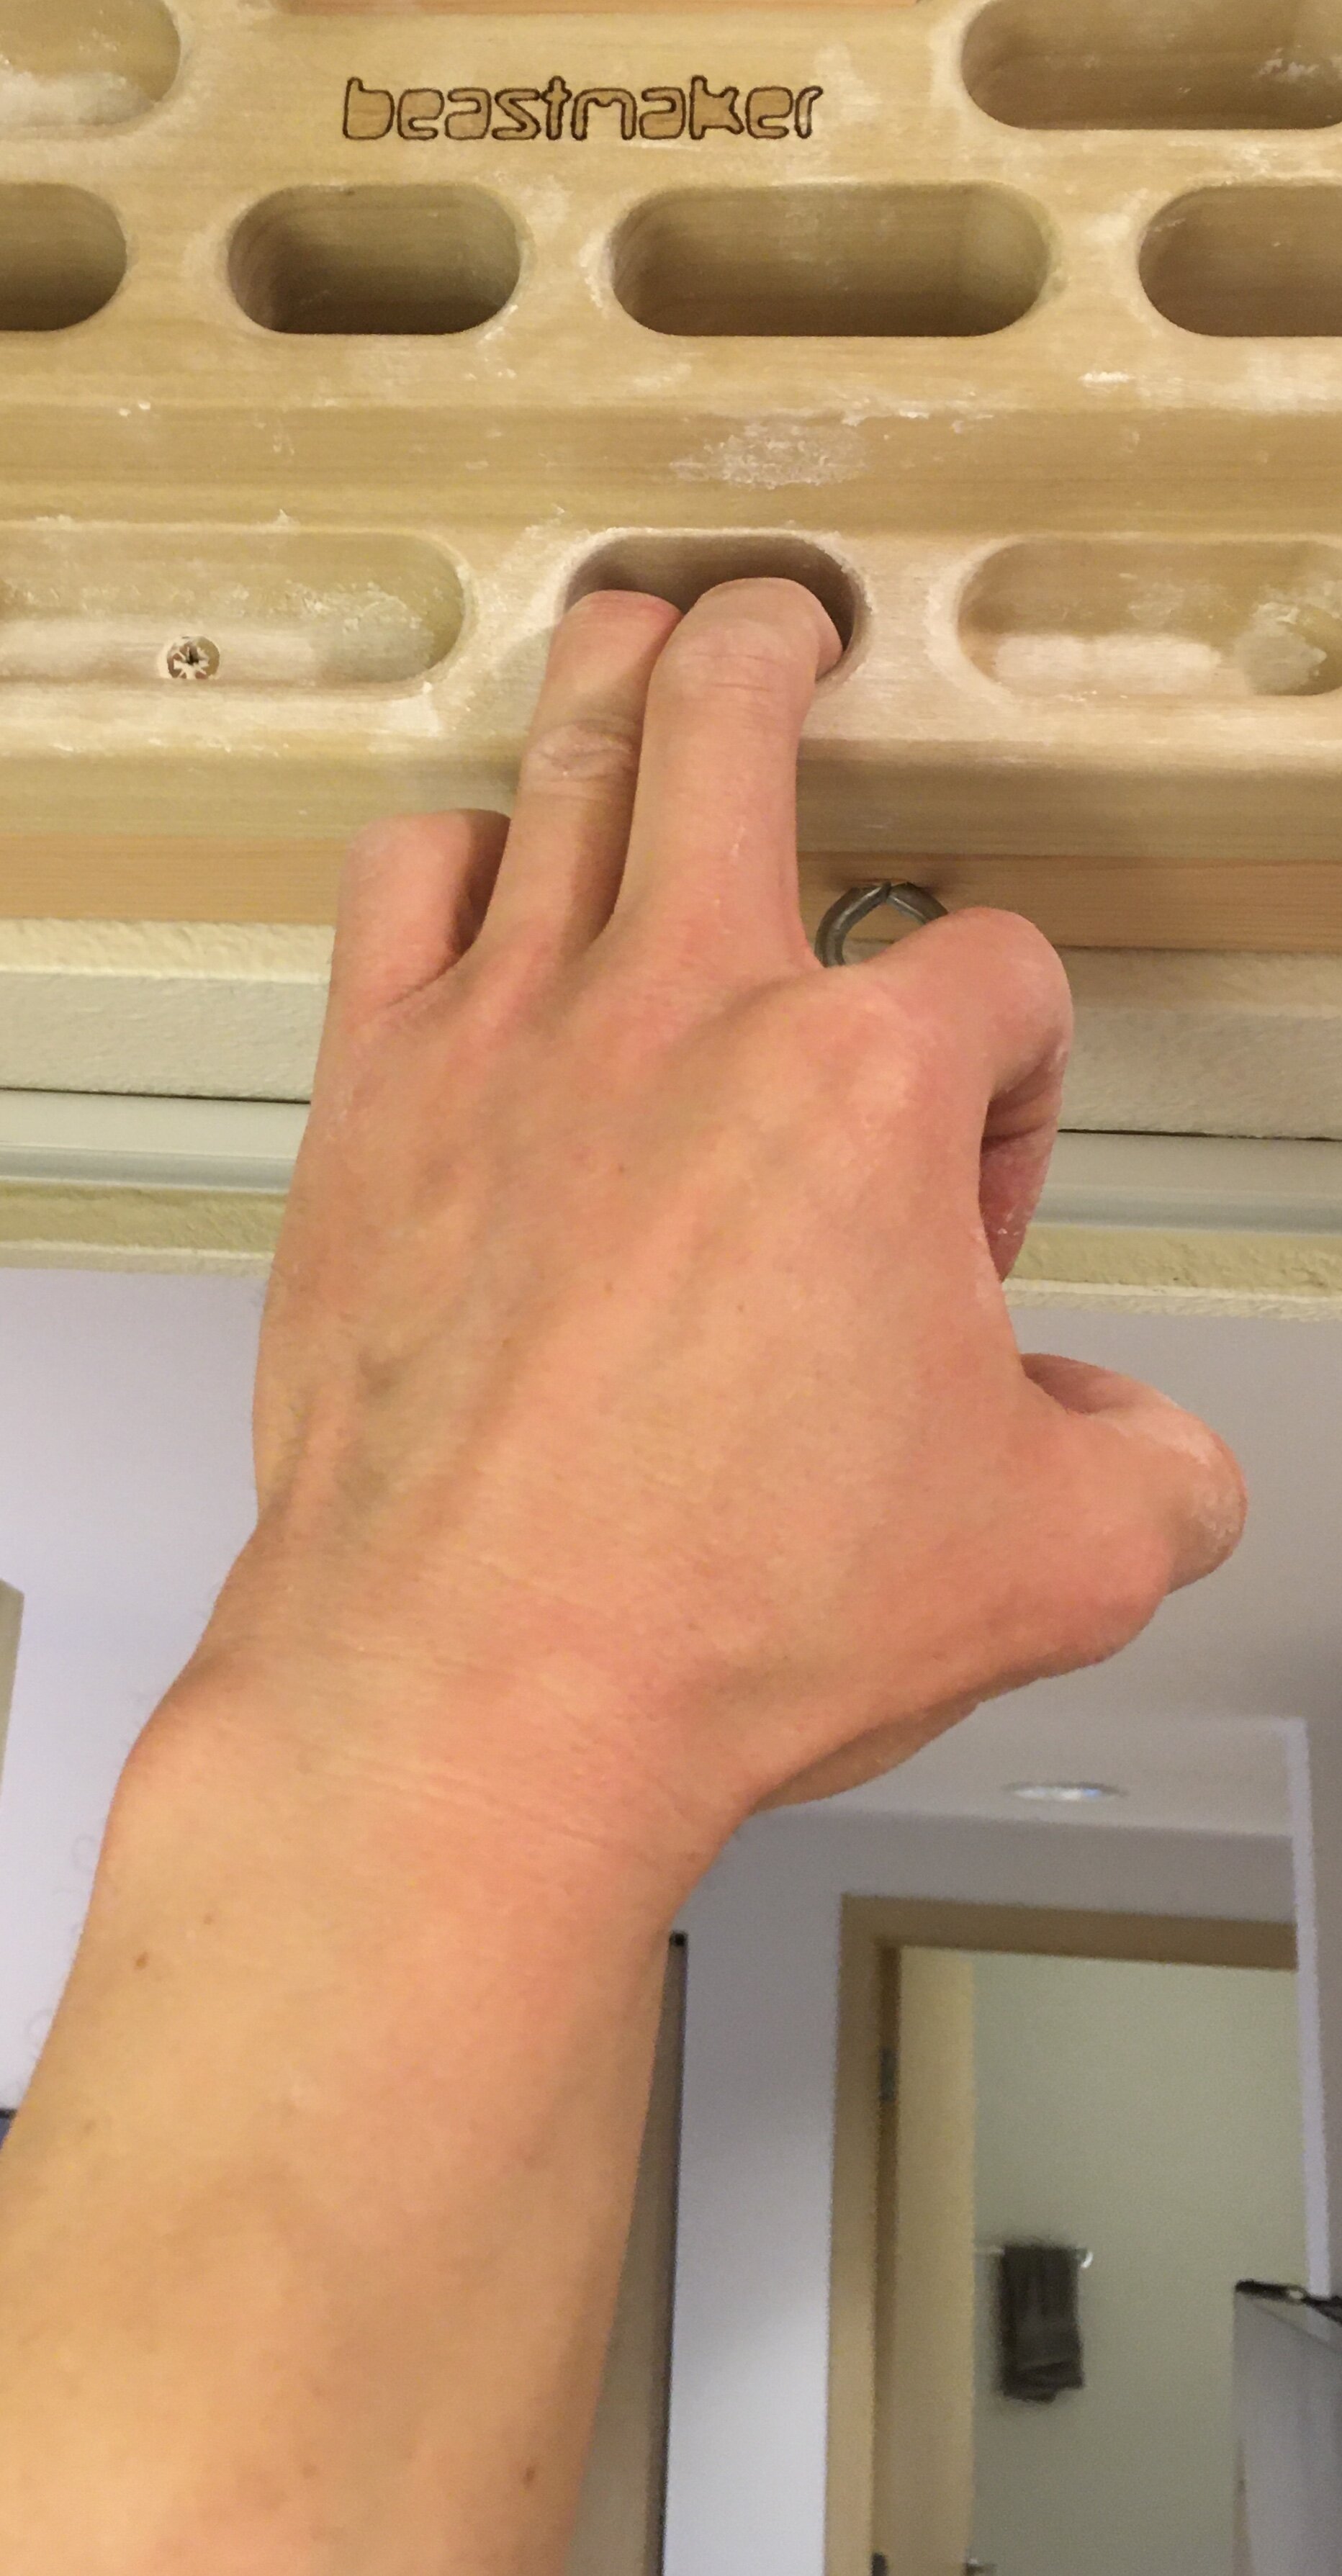
Grips

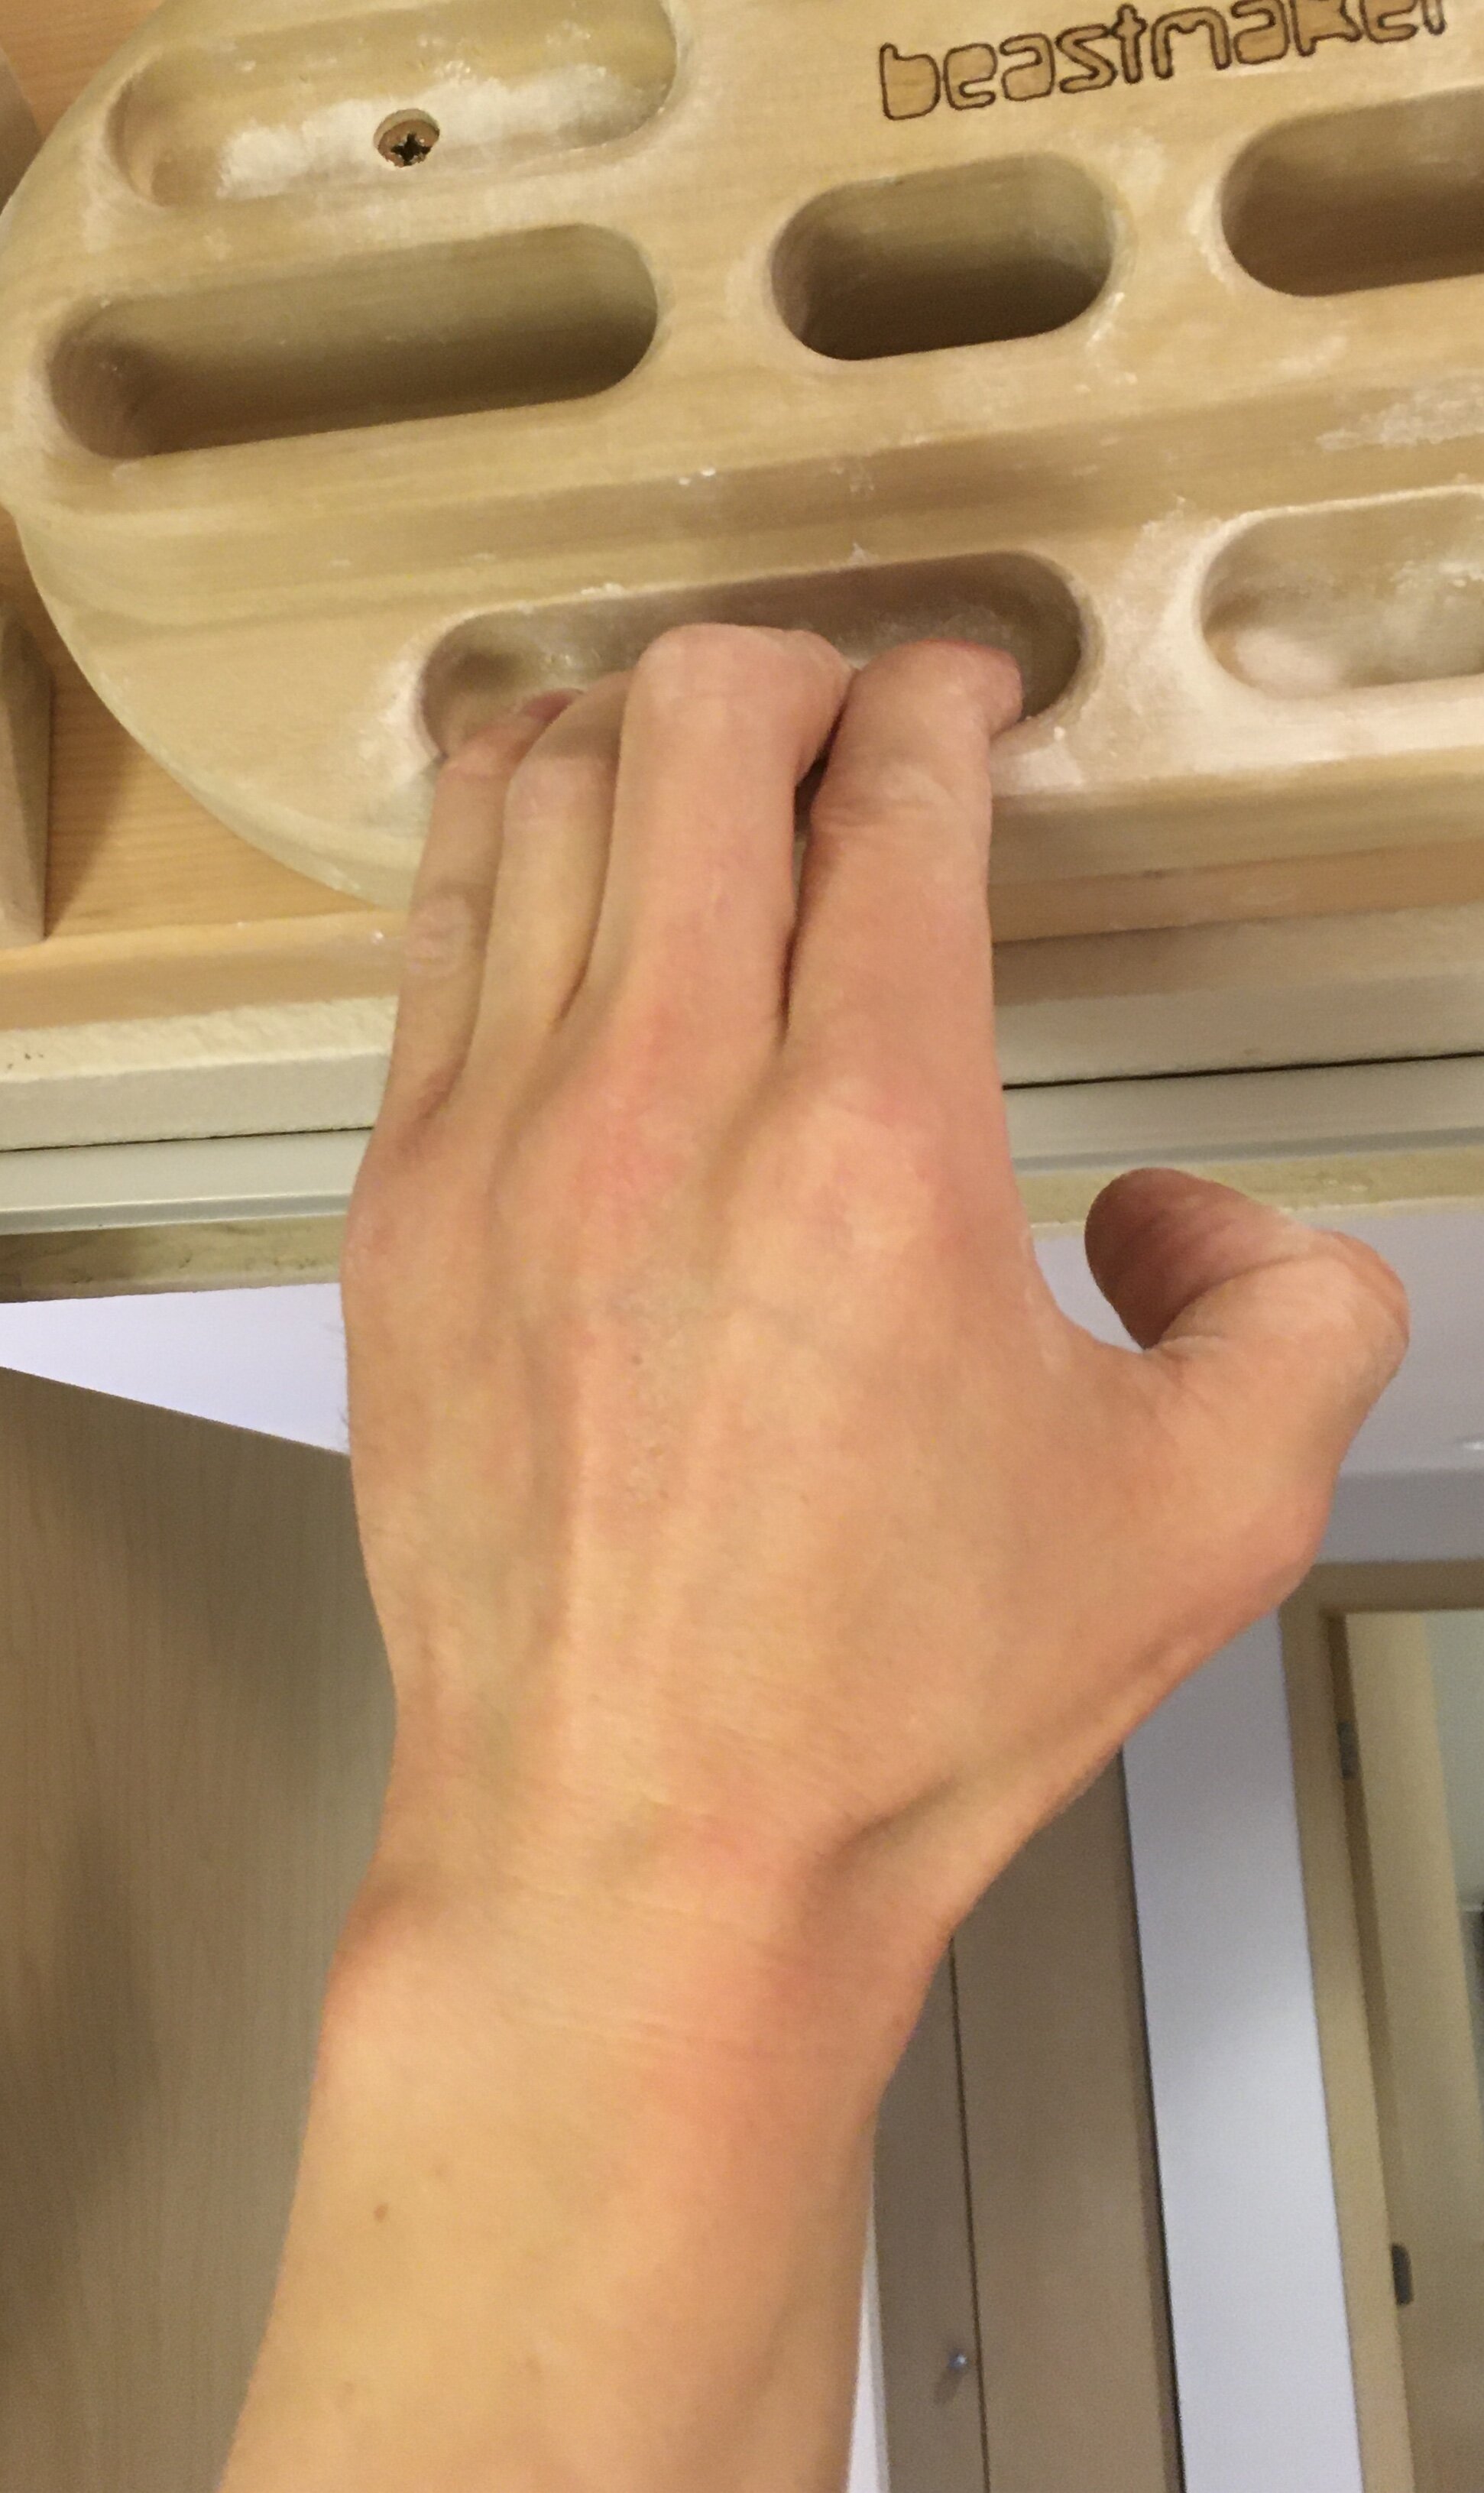
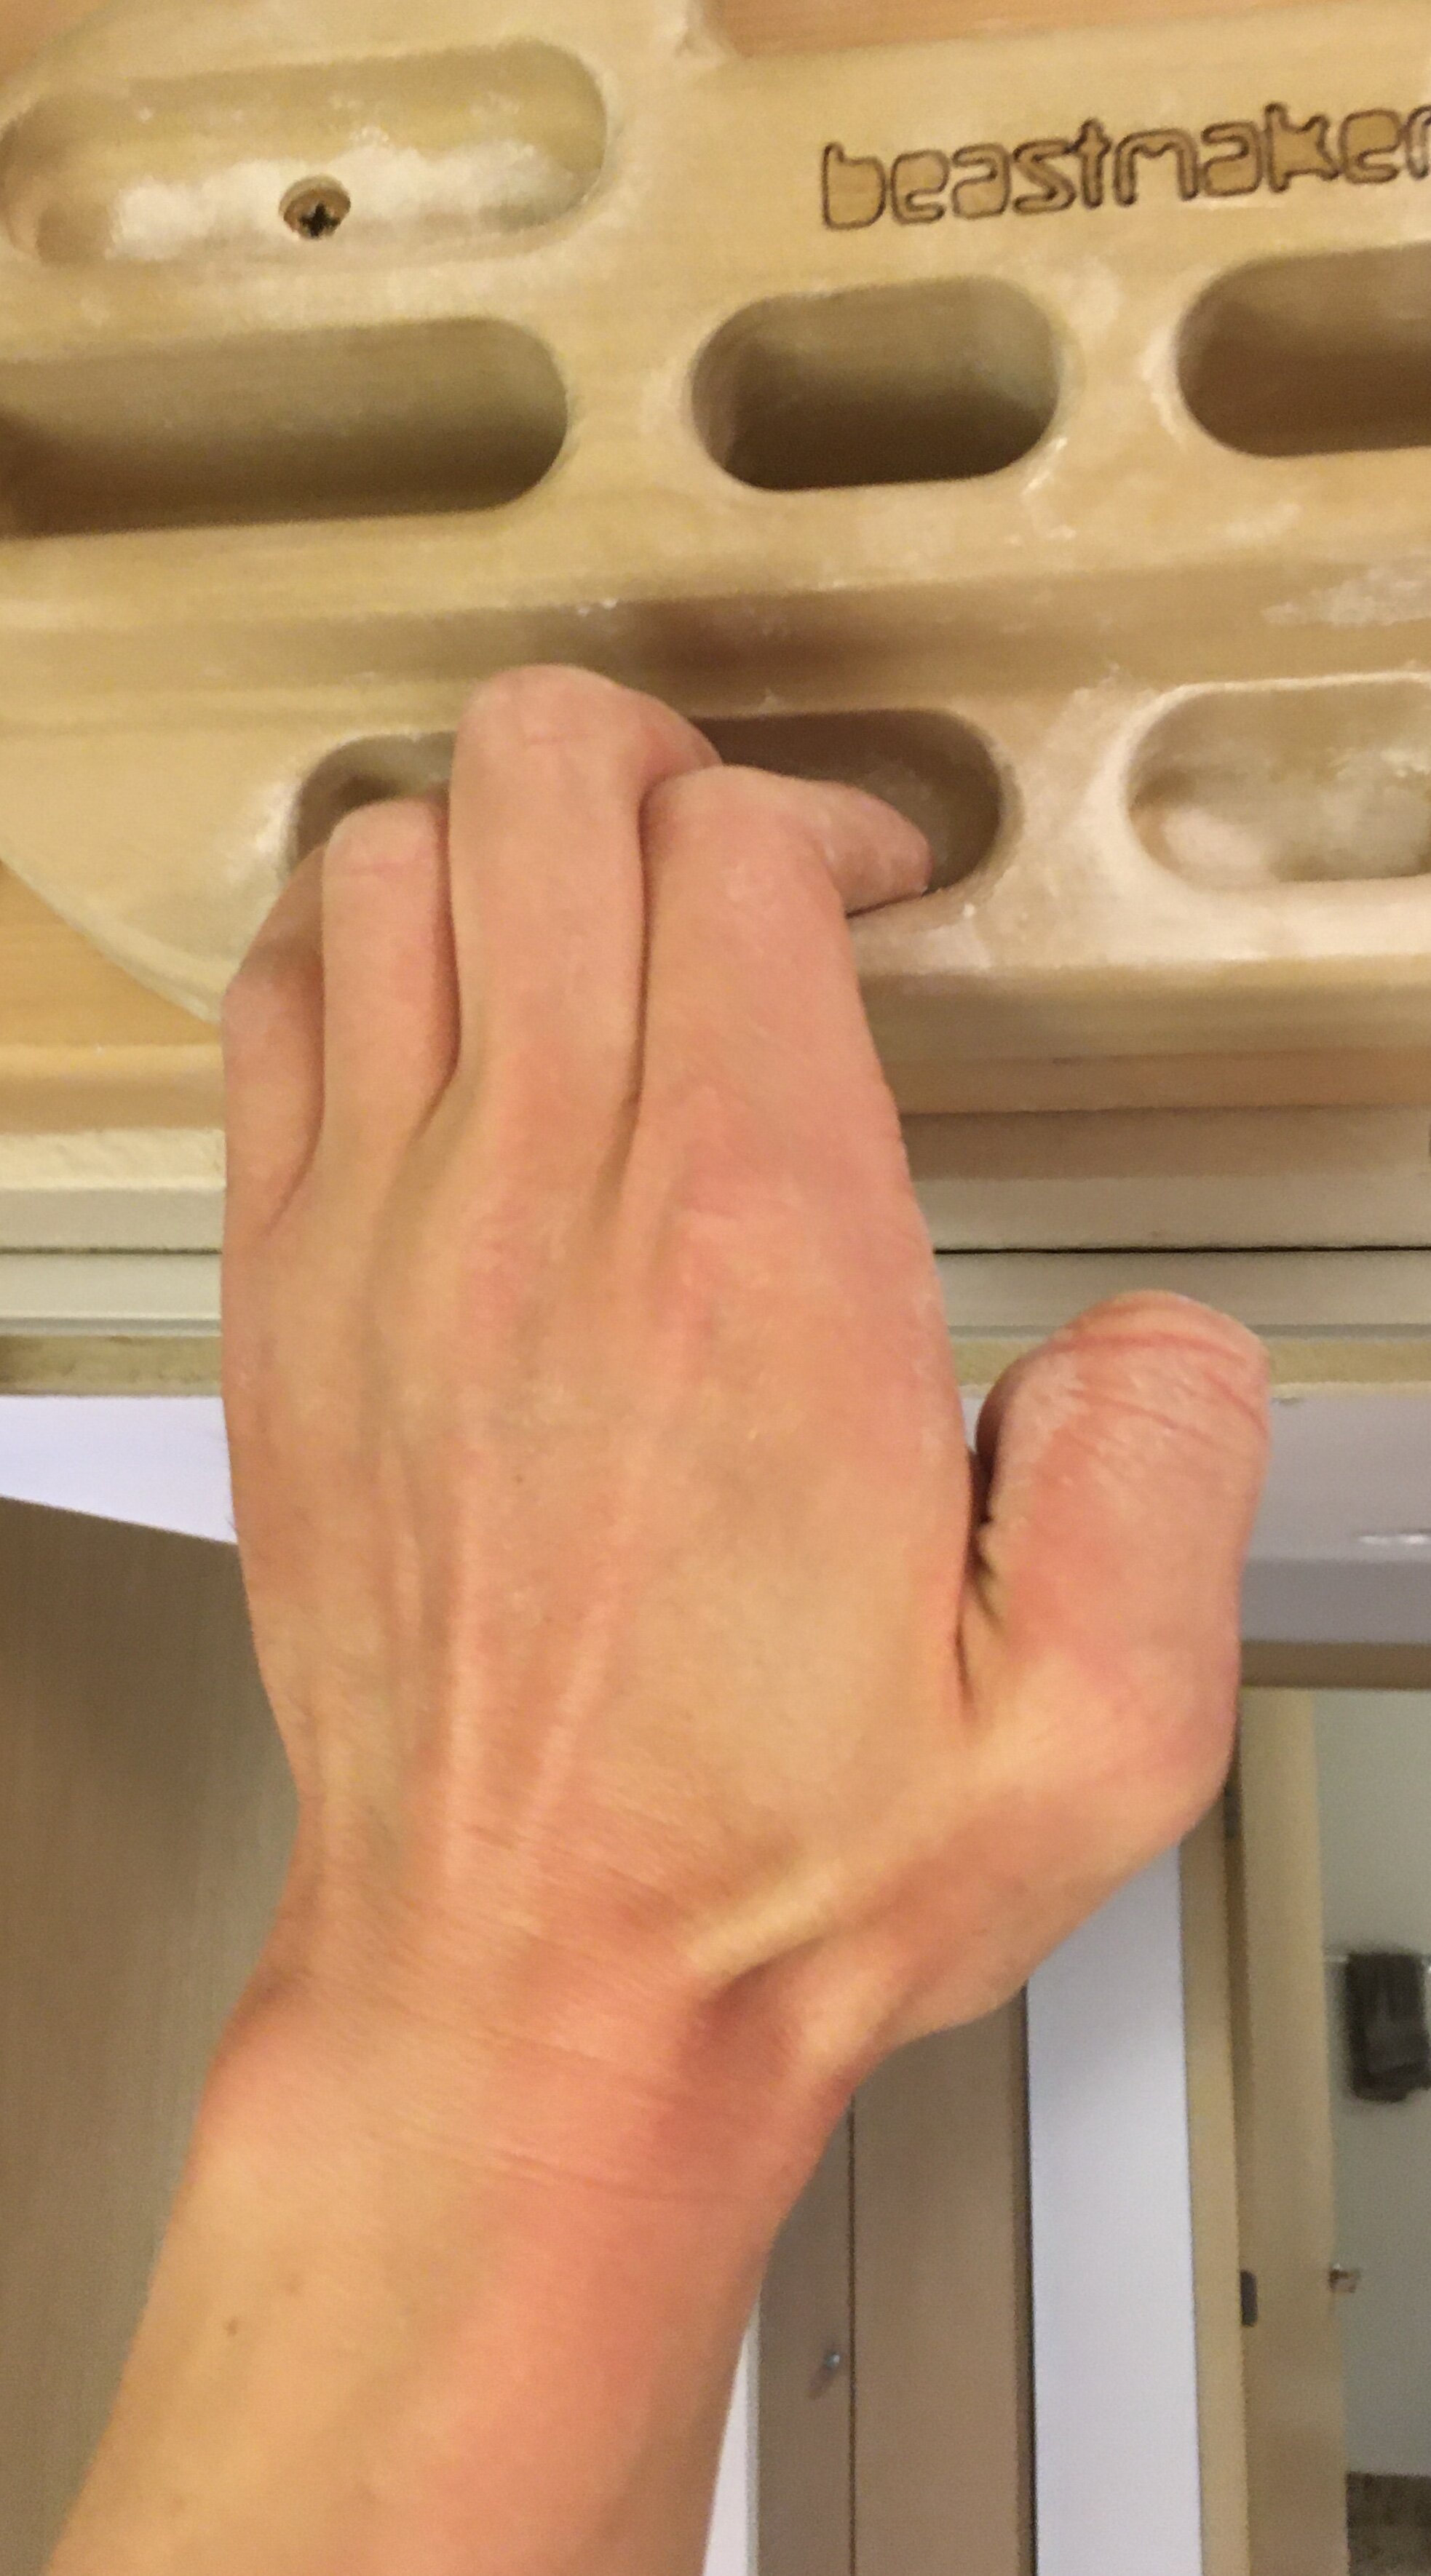
As you hang you’ll want to train different grips (pictured below). The most important grips to train are the open handed grip and the half crimp. The open handed grip is the least stressful on your fingers. The half crimp is a little more stressful, so progress the load on this gradually. It is generally recommended to avoid training a full-crimp position, which is like the half-crimp position but the thumb wraps over the index finger. Also experiment with slopers, 3 finger grips, 2 finger grips, and 1 finger grips. Some hangboards allow you to train a pinch (not pictured) which is a grip that involves the thumb.

Open
Open
Half Crimp
Half Crimp
Sloper
Sloper
3 Finger Drag
3 Finger Drag
2 Finger Pocket
2 Finger Pocket

Other Training Ideas

Getting bored with dead-hangs? There are lots of other things you can train on a hangboard. Try training a pull-up, knee raises, straight leg raises, toes-to-bar, front levers, one arm dead hangs, and one arm pull-ups. As always you can add or subtract weight as needed.

Important Tips

It takes muscles a few months to start getting stronger, but it takes years for the tendons and connective tissues of your fingers to start adapting to training. It’s very important to be gradual the first year you hangboard to avoid overuse injuries. Be sure to keep a training log to track the weights you are using. You will begin to see improvements in your strength over time.

Also never forget to warm up before you hangboard. At home, you can spend 10 minutes doing sub-maximal hangs and pull-ups to get your fingers and shoulders warmed up.

Most importantly, keep your workouts fun so you stick with it. With consistent work you might find that you are a stronger climber when the crags and gyms open up again. Good luck!

-Scott McAmis, DPT, OCS, CMPT

References

Anderson ML, Anderson ML. The Rock Climber’s Training Manual: A Guide to Continuous Improvement. Boulder, CO: Fixed Pin Publishing; 2014.

Horst EJ. Training for Climbing: The Definitive Guide to Improving Your Climbing Performance. Guilford, CT: Falcon Guides; 2002

Pincus M. Comparing Hangboard Protocols. Training Beta Website.

https://www.trainingbeta.com/comparing-hangboard-protocols/. Published January 5th, 2018. Accessed April 17th, 2020.

In Climbing Tags Rock Climbing, Training, Injury Prevention

Breastfeeding Ergonomics

April 21, 2020

The postpartum period can be quite stressful for new moms when the body is trying to heal while the mind and body are struggling to find some rest. A lot of time is spent holding and feeding the baby, breast or bottle. It is very easy to only focus on making sure your baby is taking enough milk, while ignoring your own comfort.

So what is the ideal posture? There is no "one fits all" rule here. What is ideal for one may not be for another and vice versa. However, little adjustments within your setting can go a long way in helping to achieve a position of maximal comfort. 
 
Here are some helpful tips for new moms:


1) PILLOWS!!! They are your best friends here. All those pillows you picked up from Target are finally going to come handy.  Place one behind your low back, under your arms and under baby's butt. Tuck them wherever you think would help to relax the muscles in neck, shoulders and back (like under the elbows/arms). Depending on your height and the chair you are using, the number of pillows can vary but these adjustments can make HUGE difference. For example, a small pillow at the hollow of your low back can put your diaphragm in a good position and thus assist in breathing more efficiently. Trust me, after the amazing feat your body has performed, you need all that oxygen for healing. So no matter whether it is cradle, cross-cradle, football or laid back, those pillows go a long way in making the whole process more comfortable for you. Also, consider using the nursing pillows available in the market. There is no such thing as too many pillows when it comes to nursing. 

2) Focus on your breathing. Is it shallow? Drop your shoulders, unclench the jaw and ease back into the pillow support. Take deep, slow breaths with full exhalation. It is important that you are able to draw in a deep breath after a complete exhalation. When you can find time during the day, try to meditate. When we breathe using only shallow-breaths, our sympathetic nervous system is activated, sending us into a fight-or-flight mode, which is our body's natural response to stress. Meditation can help in achieving a deep and calm breathing pattern, which will help you to feel more relaxed.

3) While we all want to gaze lovingly at our babies, this can negatively affect our posture. When you are feeding your baby, is your upper back hunched? Is your neck bent down? If and when possible recline back while nursing, while making sure your baby is able to breathe comfortably. An added bonus is the fact that this posture aids in the development of baby's neck control. With extended feeding durations (for both breast and bottle) the front of your torso and shoulders get shortened and stiff. This, in combination with hunched back and forward head posture, causes an imbalance in the muscles of the shoulders, back, neck and diaphragm. The diaphragm is the major muscle in our trunk that aids in respiration. The diaphragm works with both the abdominals and pelvic floor muscles for proper function. With good posture and deep breathing, mentioned above, you are giving these important muscle the best opportunity to work properly.

4) Whether you are nursing or bottle feeding, switch sides every 15 minutes. Not only is this great for establishing the milk supply but,  also for giving a break to the muscles on one side while the other side is working. Phone timers or alarms help. 

5) Use a small foot rest to bring the knees higher, thereby relaxing the low back and abdomen.

6) Therapeutic exercises go a long way in getting new mothers safely back to their daily activities. Specific exercises are safe to do from the first month after childbirth and can help relieve the muscle imbalances that occur during pregnancy.  Some of my favorite appropriate are listed in the references below. 

For more information on postpartum posture, breathing and exercises, please visit a physical therapist specializing in women’s health and pave a safe path to recovery!

-Ishi Upasani, PT, MS


References:

https://www.coreexercisesolutions.com/belly-breathing/

https://www.coreexercisesolutions.com/a-better-approach-than-belly-breathing-for-the-pelvic-floor/B

In Ergonomics Tags Breastfeeding, Women's Health, Newborns, Posture, Ergonomics

Tips For A Pain-Free Return To Gardening And Yard Work

April 16, 2020

Gardening and yard maintenance projects can be difficult to perform when returning from an injury or when dealing with persistent pain. These outdoor projects often consist of lots of repetitive movements, bending, crouching, and heavy lifting which can often exacerbate symptoms, leaving you sore and stiff afterwards.      

The following tips can help you decrease your risk of symptom provocation with gardening and yard work:

Use proper lifting techniques

When lifting heavy objects in your yard or garden try to use proper lifting mechanics. This includes bending at the knees and waste, trying to maintain a neutral spine position, keeping the object close to your body, and using both hands to lift heavy objects. Avoid twisting while lifting or lowering the object, instead pivot your feet to square your shoulders up with the direction you are moving the object. When you can, recruit other people to help when lifting heavy or awkwardly shaped objects.

Pace yourself and break up tasks 

It can be easy to look at your lawn or garden and come up with a lengthy to-do list of projects. Rather than trying to accomplish all of these projects in one weekend, consider breaking up your projects into shorter chunks of time and spacing them out. Working for 20-30 minutes at a time and then taking a break for 30-60 minutes can help distribute the load you are putting on your body and can help you determine how much activity you can tolerate. This can be especially helpful if you are returning to gardening after a recent injury that is aggravated by repetitive motions or sustained postures. This may prolong the time it takes to complete a project, however it will likely decrease the risk of a significant flare-up in symptoms.     

It can also be helpful to break up challenging tasks with easier tasks. Break up an arduous task, like digging fence post holes or shoveling bark, with a lighter task, like planting bulbs or light weeding.    

Warm up and cool down 

It may be helpful to perform a warm up before tackling your outdoor project. This could include a short walk or a series of warm up exercises. This may consist of active or dynamic stretches for a specific body region, such as the hips, low back, shoulders, or wrists. Consider performing more stretching exercises as a cool down after you are finished for the day.  

Switch hands and positions periodically

If you can, use both hands to complete repetitive tasks, such as pruning or weeding. Avoid sitting, crouching, or bending in sustained positions for prolonged periods of time. Take a break from a certain position after 10-20 minutes. Use this break time to get up, stretch, walk around the yard, or grab something to drink. Changing positions frequently can help decrease the stiffness and soreness that is usually accompanied by staying in one position for too long. If you tend to lose track of time in your yard, it may be helpful to set a timer while you are working to remind you to take breaks.         

Use the right tools 

Working with appropriate garden tools can help limit repetitive movements and decrease risk of overuse injury. A wheelbarrow can help you carry and transport heavy and awkward objects, such as bags of mulch and fertilizer. Sharp shears and pruning tools can decrease strain through your wrist and forearms. A long garden hoe can limit stooping and leaning while weeding. Some garden hoes are designed to be pushed instead of pulled to limit repetitive pulling motions.     

If you tend to sit while gardening use hand tools to help your hands stay healthy. Hand tools can reduce the effort needed to weed and move soil and can decrease unnecessary strain on your hands. You can use a soft pad or knee pads to kneel on to take pressure off of your knees. Garden stools can be used to get closer to your workspace to avoid bending for prolonged periods. 

Elevate your workspace

Elevating your workspace from 18 inches to waist height can decrease the amount of bending required through your lower back. Complete projects on a workbench if able and use raised garden beds if available. Try to construct and use garden beds that are only as wide as you can reach, a few feet or so, which can decrease strain with prolonged reaching. If installing garden beds, U-shaped or circular shaped raised garden beds are easily accessible from several sides and can allow you to keep your workspace close to your body.   

In summary, when completing a yard or garden project remember to start small, take plenty of breaks, switch up your body position, keep your workspace close to you, and use the right tools and equipment. Happy Spring!

-Sean Tyler, DPT


References:

https://learn.eartheasy.com/articles/15-tips-for-gardening-with-chronic-pain/

Tags Gardening, Yard Work, Injury Prevention

Telehealth 101: Frequently Asked Questions About Virtual Physical Therapy Appointments

April 9, 2020

At Salmon Bay Physical Therapy our top priority is keeping our local community strong and healthy.  Due to the recent COVID-19 pandemic and social distancing orders we are providing virtual physical therapy appointments through a secure online telehealth platform on a case-by-case basis.  Telehealth appointments allow us the opportunity to continue to provide skilled one-on-one physical therapy treatment to reduce pain and improve function, while keeping our community and staff healthy during the public health crisis. Below is a frequently asked questions section surrounding telehealth:

Is telehealth physical therapy new? 

Telehealth has been around for many years and is used all over the world to provide physical therapy care to people unable to meet with a provider in person.  This includes people living in rural or remote settings and people who would rather receive treatment from the comfort of their own homes. There are some physical therapy companies that provide care and improve their client’s function strictly through telehealth services.  

Are telehealth physical therapy appointments covered by my insurance? 

Most health insurance plans are covering telehealth physical therapy services during the COVID-19 pandemic.  In Seattle, this includes Premera, Cigna, Kaiser, Regence, Aetna, L&I, and BCBS Boeing. If you have specific questions about your coverage please contact your local physical therapy office. 

What conditions can telehealth physical therapy help with?

Telehealth physical therapy can help in the treatment of a variety of orthopedic conditions, including treatment of injuries to joints, muscles, bones, ligaments, and tendons.  Telehealth physical therapy can provide you with functional exercises to build strength, flexibility, and/or stability in order to decrease pain and improve function.  Telehealth physical therapy can also be used to help people recover from surgery, improve their balance in order to decrease the risk of falling, or work on improving more chronic injuries.  

Does telehealth physical therapy work? 

There have been several research studies performed that have found telehealth physical therapy to be a viable treatment option for people with various musculoskeletal conditions.  Some of these study findings are summarized below:   

  • Telehealth physical therapy is a viable option for people with chronic low back pain in long-term management of their condition (1). 

  • Telehealth physical therapy can significantly improve functional independence, cognition, and patient satisfaction (2).

  • Patients treated for musculoskeletal conditions through telehealth physical therapy demonstrated improvements in movement and function in a few visits and maintained these improvements after 3 months (3). 

  • Patients who received telehealth physical therapy following knee replacement reported similar clinical outcomes and satisfaction compared with patients who received in-person care (4). 

How can a physical evaluation be performed via telehealth?  

A physical therapy evaluation always begins with a ‘subjective assessment’ which includes a discussion of the history of your injury or condition and a series of specific questions about your symptoms and limitations.  Through the subjective assessment a physical therapist will often reach a probable diagnosis before ever touching a patient.  

A physical therapist can then perform an ‘objective assessment’ that will include watching how you move while watching you perform certain activities (reaching, standing on one leg, squatting, bending, moving around in bed, etc).  This movement assessment will help the therapist determine your range of motion or strength impairments. This functional movement assessment can help the physical therapist better determine your probable diagnosis along with your physical and functional impairments.  The physical therapist can then develop a plan of care to work on decreasing your symptoms and improving your function from the comforts of your home.

What about manual therapy and hands on treatment? 

Hands on treatment through manual therapy is a small piece of a physical therapy plan of care.  In many cases there are exercise alternatives to manual therapy that can help decrease muscle tension, improve joint range of motion, and ultimately help decrease pain and improve movement.  Physical therapy exercises are oftentimes much more important in promoting lasting changes in pain and function. Self-performed manual therapy techniques can also help put you in control of alleviating your symptoms.     

What type of equipment do I need to complete a telehealth visit?

To complete a telehealth visit you will need:

  • Computer or smartphone with a camera/webcam and an internet browser 

  • Access to a good internet connection

  • A quiet and private location with enough space to move around comfortably

  • Comfortable, loose fitting clothes 

  • Any resistance bands or small weights available.  If you do not have this equipment, that’s OK! Your therapist will have alternative ideas for resistance based on what you have available at home.  We may also be able to deliver resistance bands to your home as needed.

Stay healthy!

-Sean Tyler, DPT


REFERENCES 

  1.  Telerehabilitation Booster Sessions and Remote Patient Monitoring in the Management of Chronic Low Back Pain: A Case Series [Physiother Theory Pract. 2018;34(5):393–402.]

  2.  Effects of Physical Therapy Delivery Via Home Video Telerehabilitation on Functional and HealthRelated Quality of Life Outcomes [J Rehabil Res Dev. 2015;52(3):361–370.] 

  3. Case Studies in Physical Therapy: Transitioning a “Hands-On” Approach Into a Virtual Platform [Int J Telerehabil. 2018;10(1):37–50.] 

  4. Clinical Outcomes of Remote Asynchronous Telerehabilitation Are Equivalent to Traditional Therapy Following Total Knee Arthroplasty: A Randomized Control Study [J Telemed Telecare. 2017;23(2):239-247.]

Tags Telehealth, Telemedicine

Anatomy 101: "Pinched" Nerves

February 24, 2020

The human nervous system, comprised of the brain, spinal cord, and peripheral nerves, is responsible for transmitting signals between different parts of the body. Think of this as a complex system of electrical wiring in the body.  Breaking it down, our peripheral nerves play a major role in several bodily functions, including movement and sensation.    

 Just like the rest of our body, our nerves are designed to move.  A healthy and happy nerve gets a lot of movement and blood flow. Nerves consume approximately 20% of the body's oxygen supply even though they comprise only about 2% of the body's weight.  

Throughout our day our nerves are bending, stretching, and gliding while we perform normal daily activities and movements.  It is even normal for nerves to experience some temporary compression with daily activities. Many of us have had our leg "fall asleep" if sitting in an awkward position for an extended period of time.  By changing positions or moving around these symptoms go away as blood flow is restored to the nerve.   

If a nerve has been compressed or irritated for a prolonged period of time, it can become more of a problem, as unpleasant nerve compression symptoms can become more persistent.  This constant nerve compression is often referred to as a “pinched” nerve. It is also known as nerve entrapment, nerve compression, or a trapped nerve.    

Prolonged nerve compression or irritation can interfere with our nerves ability to transmit sensory and motor information through the body properly.  Symptoms of nerve compression may include: 

  • tingling

  • burning

  • numbness

  • pain

  • muscle weakness

  • stinging pain, such as pins and needles

Nerve compression can occur anywhere in the body but most often occurs in the neck, back, shoulder/chest, elbows, and wrists.   Nerves can be compressed or irritated by muscle, bone, cartilage, or the intervertebral disks of our neck and back. Inflammation in an area of the body can also affect a nerve’s ability to transmit signals properly.  

Commonly diagnosed conditions that involve nerve compression involve sciatica, stenosis, disk herniations, carpal tunnel syndrome, piriformis syndrome, and thoracic outlet syndrome. 

Although nerves love movement, an injury that involves a quick stretch or pull to a nerve might damage the tissue surrounding the nerve.  As this injured tissue heals, the healing process may affect the nerve’s ability to slide past surrounding tissue and structures, which can also result in nerve compression symptoms. 

In some cases, medical imaging can help diagnose the source of the nerve irritation.  However, a physical therapist can often determine which areas need to be addressed and provide helpful interventions to decrease symptoms without any imaging being done.   

Physical therapy can also help to address and improve the nerve symptoms.  Physical therapy can improve nerve mobility, increase nerve blood flow, and decrease inflammation of nerves, resulting in decreased symptoms.  Exercises can also be used to strengthen muscles that have become weak as a result of prolonged nerve compression. Hands-on techniques by a physical therapist can be used to improve the mobility of the soft tissue around the irritated nerve to help improve its function.  A physical therapist can also work to improve postural impairments that may be contributing to nerve compression symptoms.       

 In conclusion, one of the best ways to keep our nerves happy and healthy is through cardiovascular exercise.  Whether it is walking, running, or other sport activities, regular exercise helps nerves stay mobile and improves blood flow to our body and nervous system.

-Sean Tyler, DPT

Tags Pinched Nerve, Nerve Pain, Chronic Pain, Carpal Tunnel Syndrome, Nervous System, Spinal Stenosis, Thoracic Outlet Syndrome, Sciatica
← Newer Posts Older Posts →

Upcoming Post

What To Expect From Your First PT Appointment

Previous Posts

Blog Archive

CONTACT

Phone: (206) 789-8869

Fax: (206) 789-8873

Email: info@salmonbaypt.com

LOCATIONS

Powered by Squarespace